
Even if you aren’t a business professional, it’s essential that you know how to tie a tie with a proper knot.
You can’t get through life without having to wear a tie from time to time, so you might as well learn to have some fun with your ties.
If you know how to tie several different knot styles, you’ll always have the right look with any suit and tie.
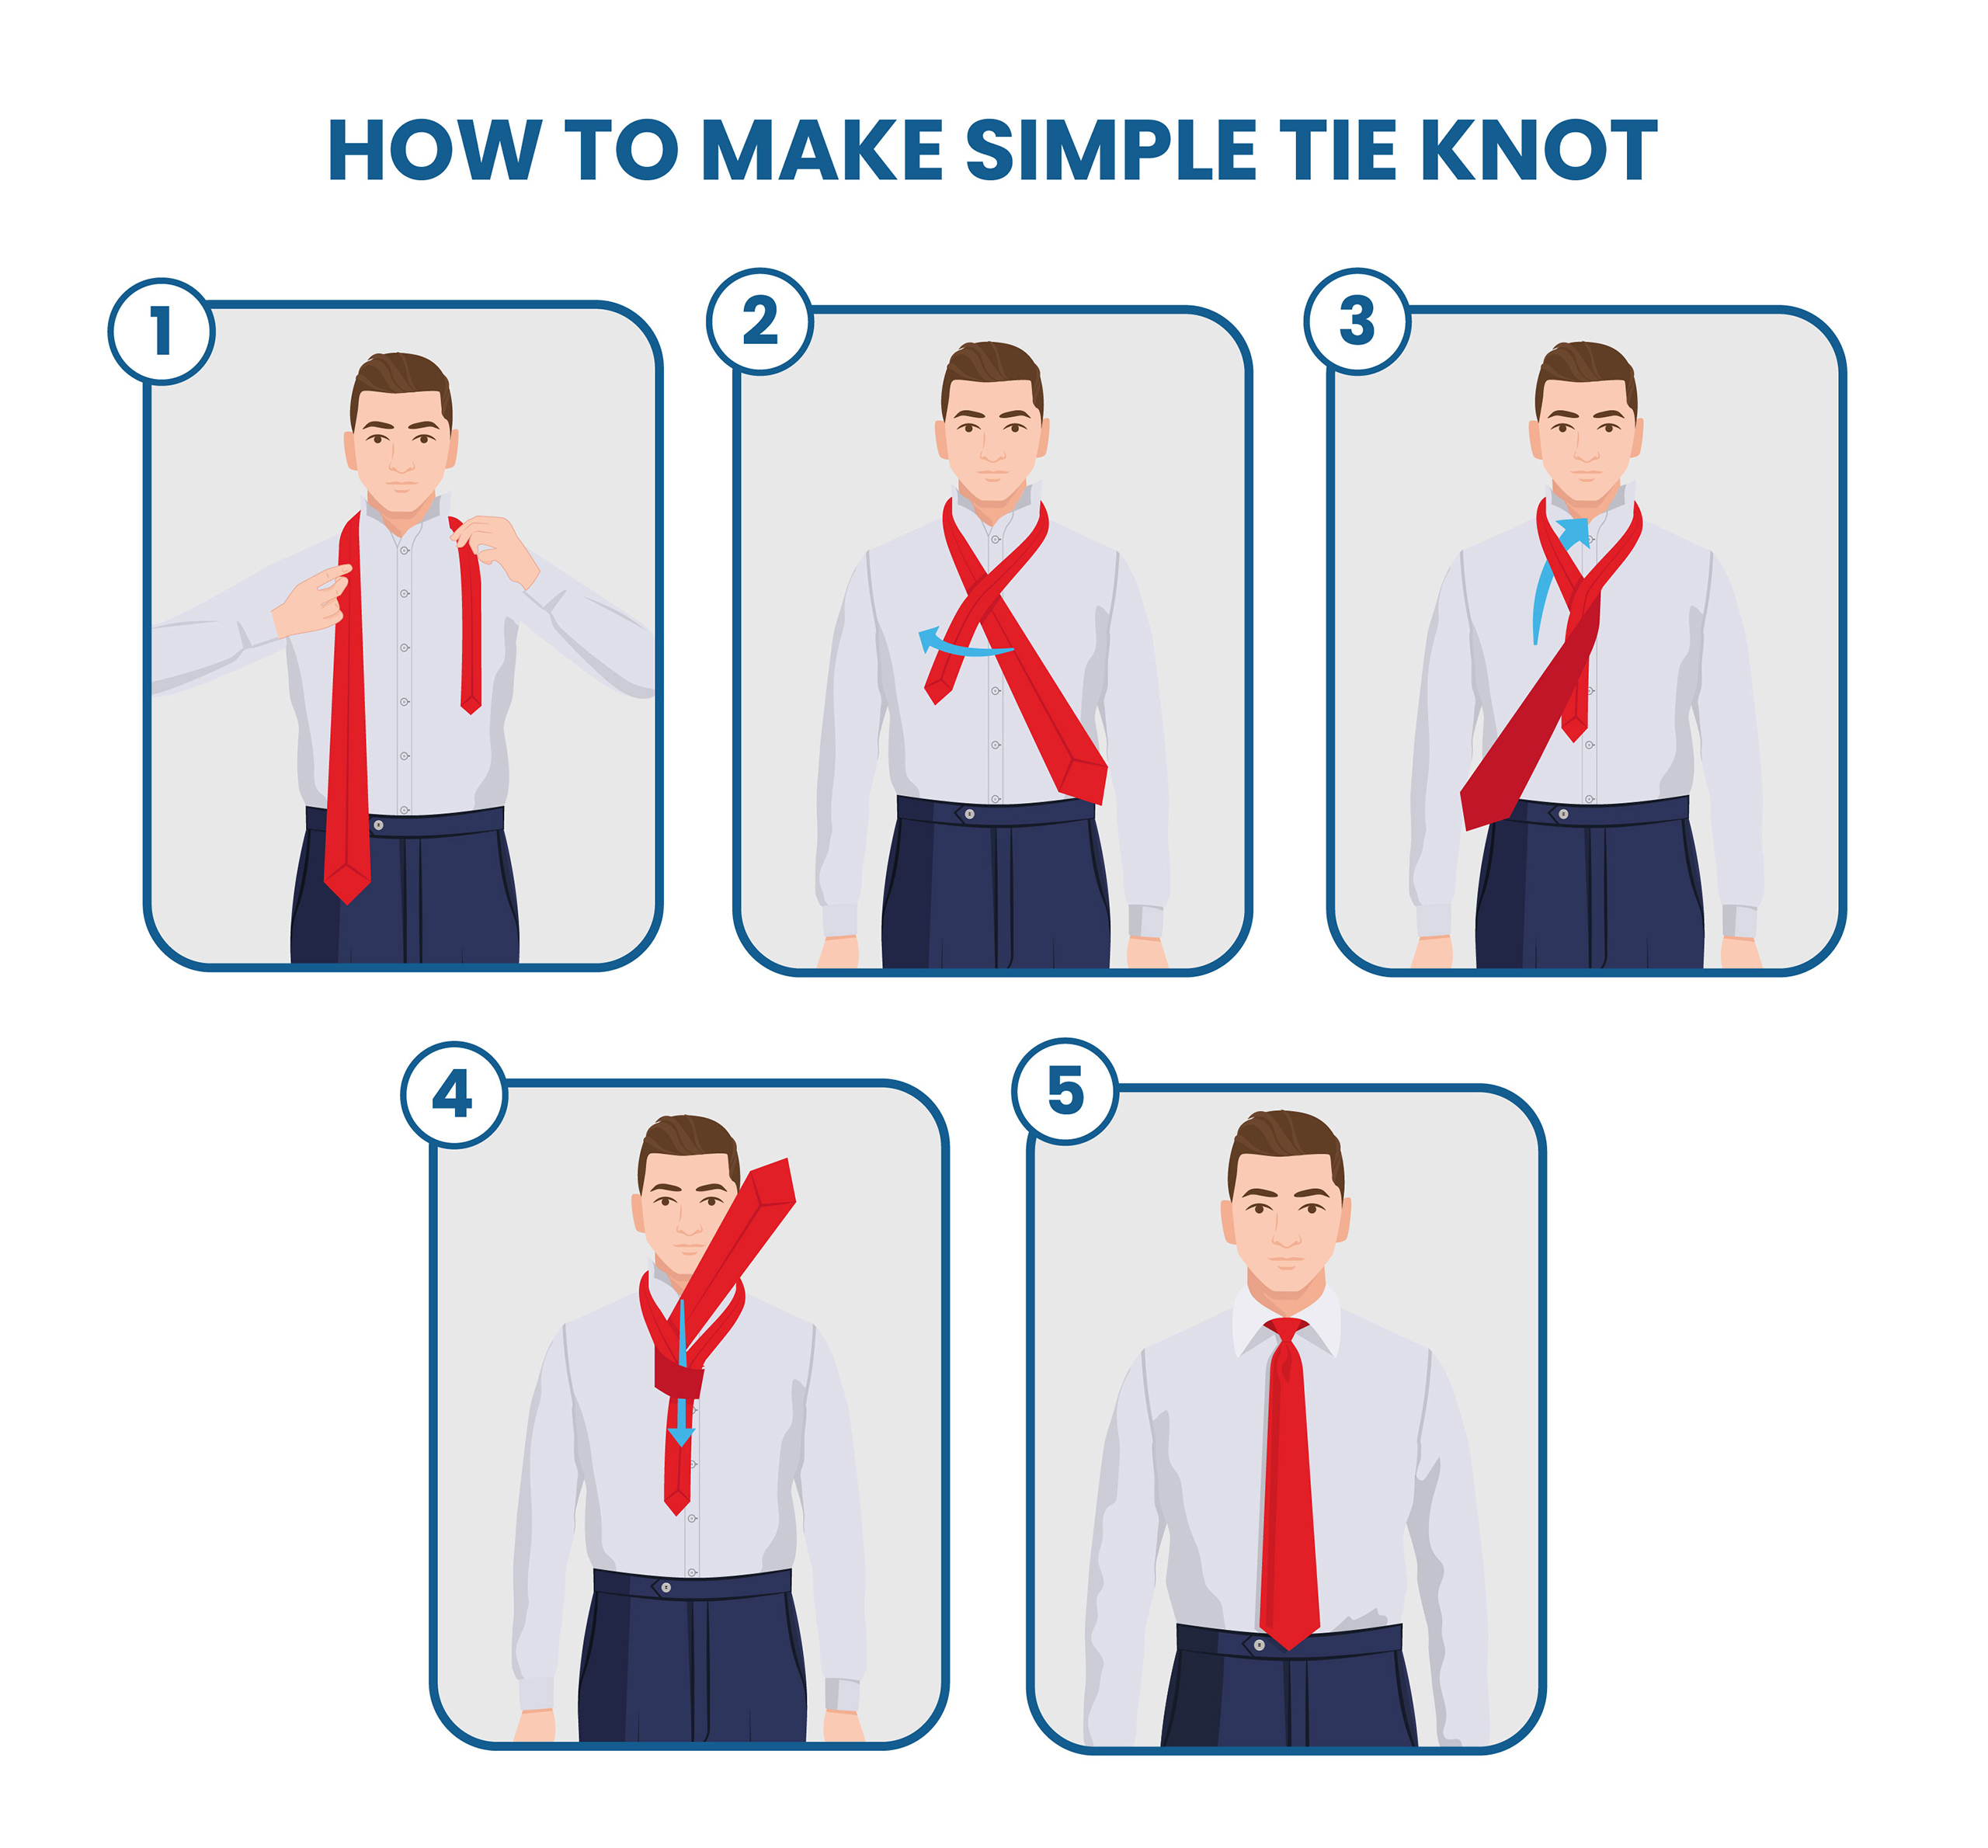
How to Tie a Simple Oriental Knot
- Lay the tie around your neck, with the “wrong side” facing outward. The wide end of the tie should be on your right side, and it must be longer than the narrow end.
- Cross the two sides. Bring the wide end under the narrow end so it’s on your left.
- Fold the same piece up and wrap it over the top of the narrow end, bringing it back to your right side. The “right side” should now be facing up.
- Feed the wide end through the neck loop from underneath, bringing it up the center toward your chin.
- Push the same end down between the layers of the tie that had been looped together.
- Pull the wide end all the way down and tighten it with both hands. You can tighten it by holding the narrow end and sliding the knot toward the top of your collar.
Oriental Tie Knot Specifications
This rarely used but stylish knot is very small and compact. It’s also slightly asymmetrical and leaves an extra long tail once it’s done, giving the simple oriental knot a little quirkiness.
If you find that your tail is unacceptably long, start over and reposition your starting levels. If it’s still too long, work with a shorter tie.
The simple oriental knot is possibly the most simple tie knot to do.
However, as uncomplicated as it is to tie, it’s decidedly challenging to untie. It isn’t a self-releasing knot.
Good For More Casual Events
The oriental knot’s asymmetry and narrow character make it suitable for casual outings.
Its small size looks relaxed and unassuming, not assertive like a bigger knot.
It’s typical to wear this knot slightly loose; if it’s tightened completely, it’s even smaller, so a looser version has a bit more bulk to it.
However, this loosening definitely lends to a more casual feeling.
Wear a simple oriental tie knot for social outings with friends, such as going out to clubs, or wear it on date night.
If you work in a casual office, this is an excellent way to style your tie because it’s a very tidy knot and looks quite polished.
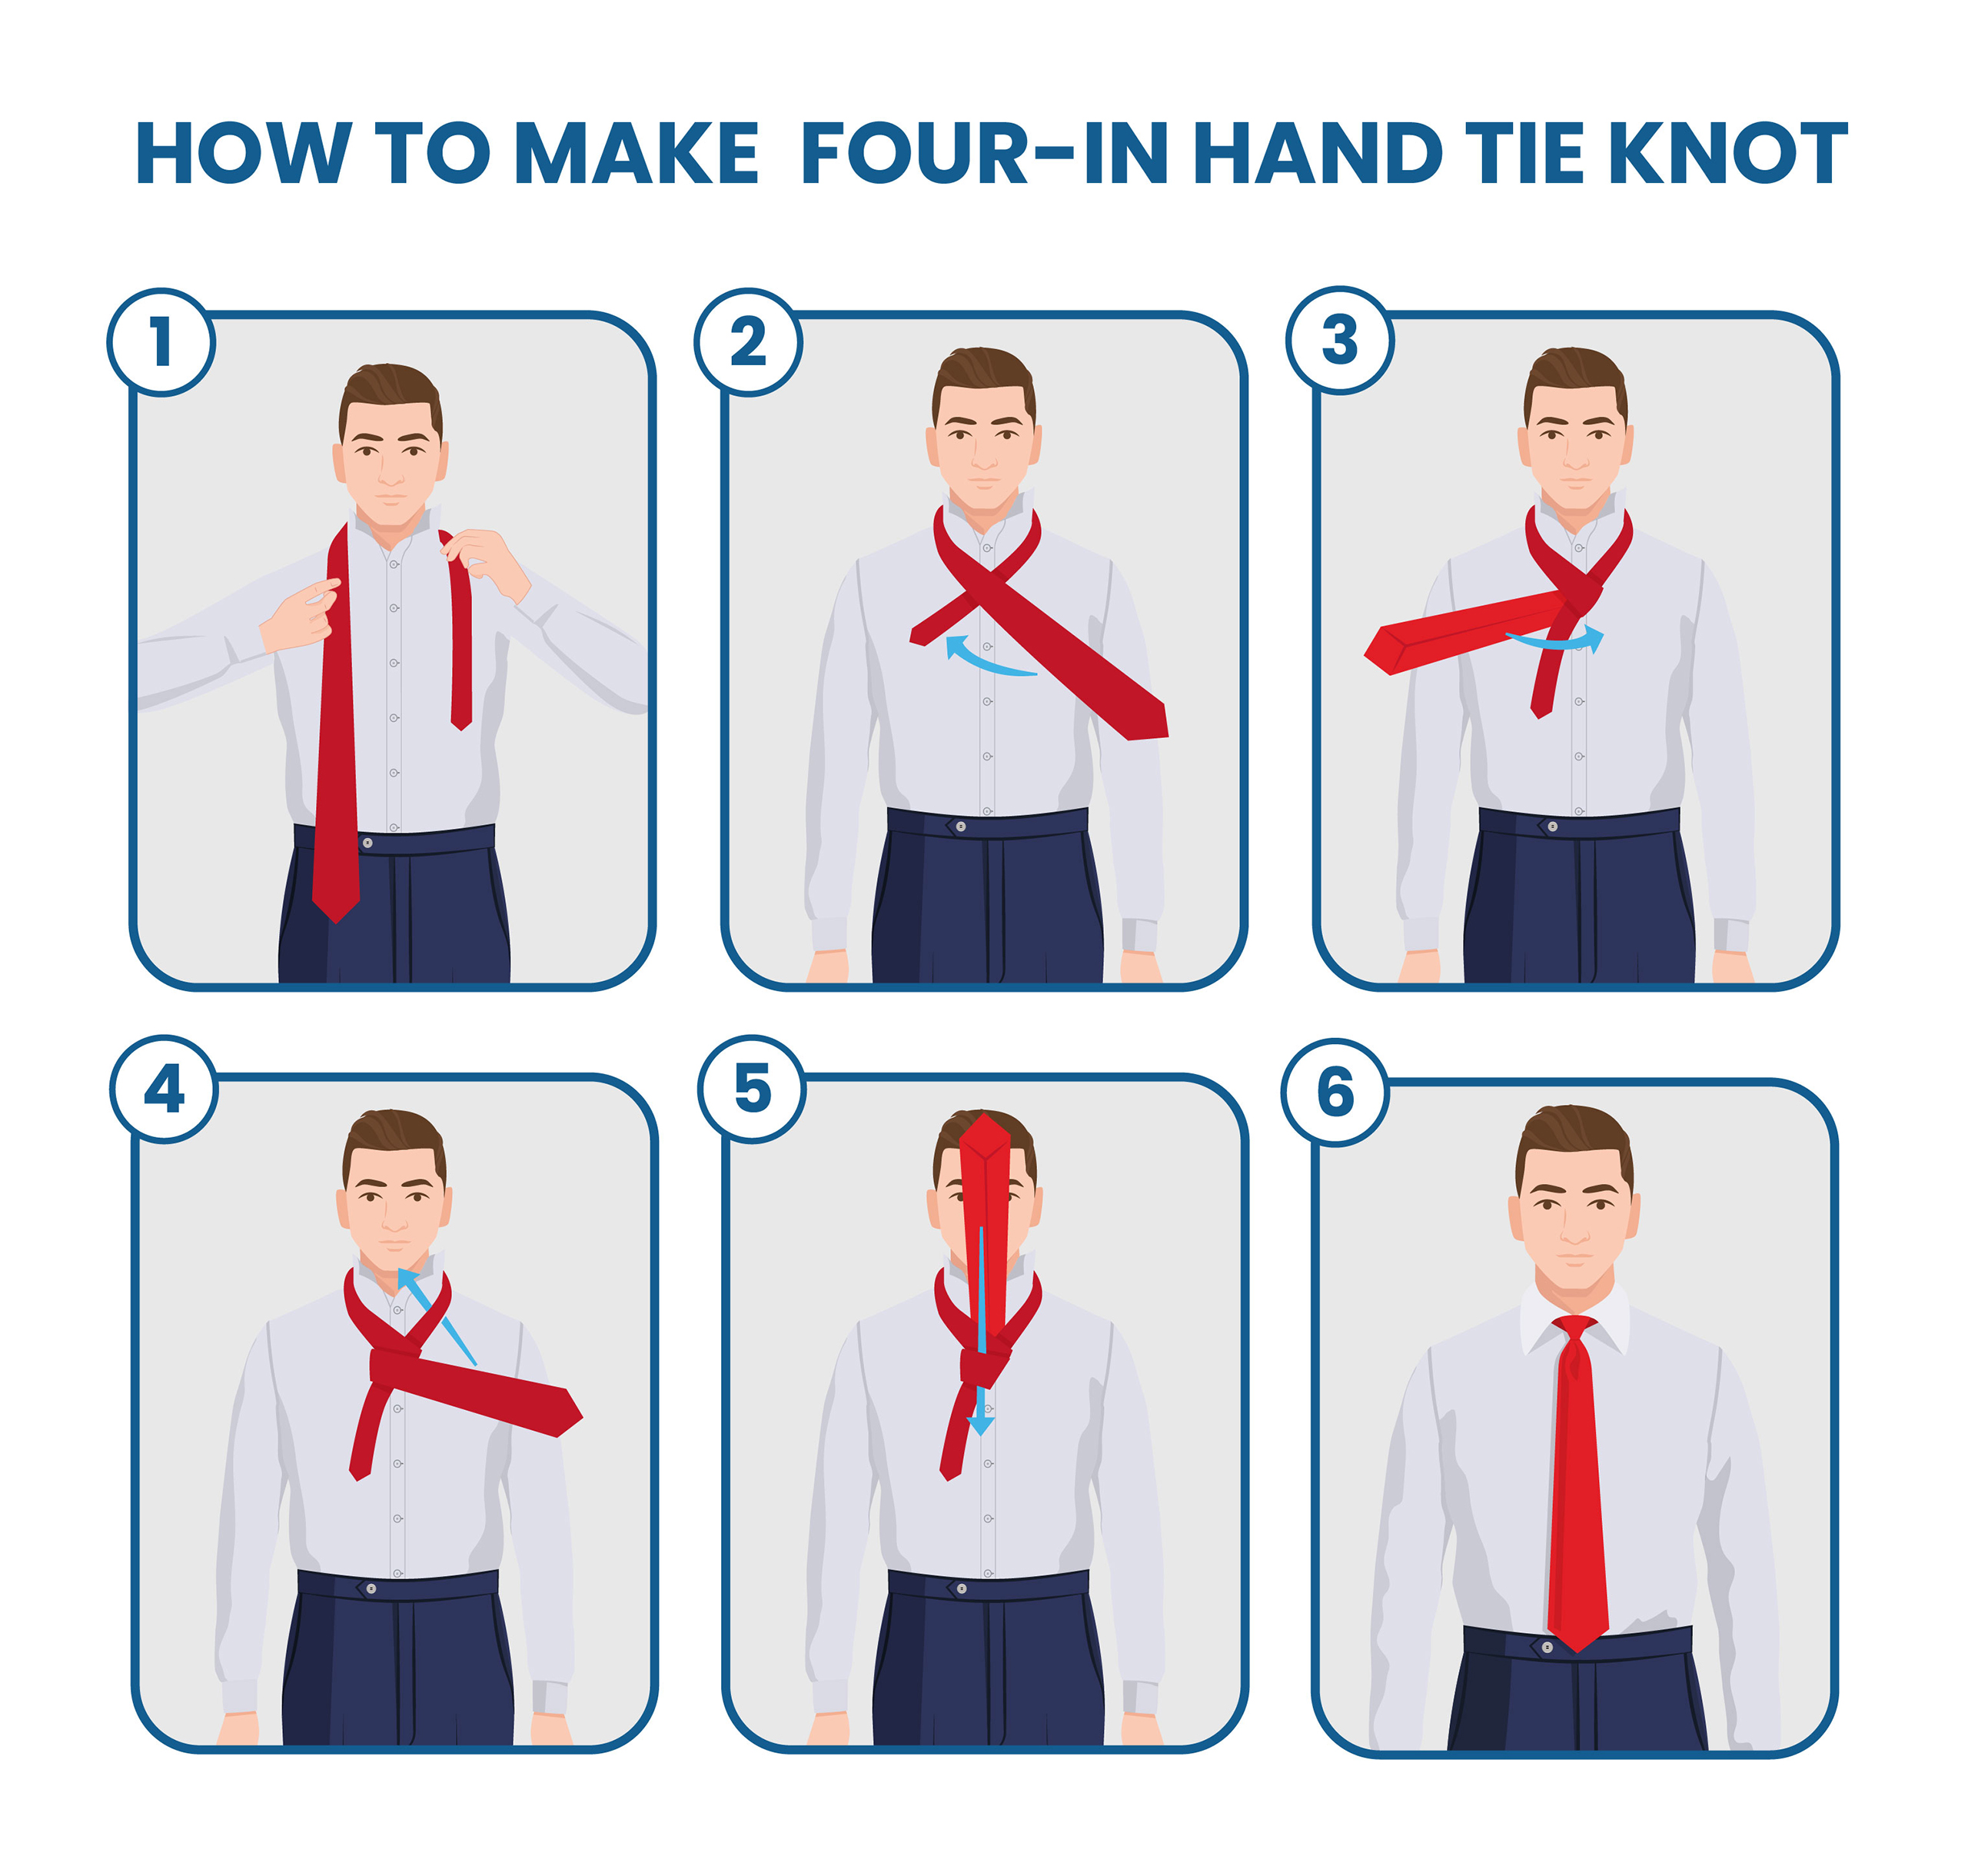
How to Tie the Four-in-Hand Knot
- Drape the tie around your neck and place the wide end on your right side. The narrow end should stop right around your belly button.
- Cross the wide end over the top of the narrow end. The wide end is not on your left side.
- Fold the wide end around the narrow end and bring it under so that it’s now back on your right. The “wrong side” should be facing up.
- Wrap the wide end around the narrow end again, bringing it over the top. Once again, it is on your left with the “right side” facing up.
- Slide the wide end up through the neck loop, inserting it from the bottom and pulling it up toward your chin.
- Tuck the tip down behind the top layer of the tie that you’ve wrapped around the narrow end.
- Pull the end completely through. Then, tighten the knot by sliding it up with one hand while holding the narrow end in place with the other.
Four-in-Hand Tie Knot Specifications
This incredibly popular style is a narrow knot that’s on the small-ish side. It’s slightly asymmetrical, and it tapers at the bottom like a cone.
The four-in-hand tie knot is incredibly simple to learn to tie. Most people learn this method first when they start wearing ties.
For that reason, it remains one of the most popular and recognizable tie knot styles.
Good For Business Casual
The four-in-hand knot is an excellent style for casual offices. It looks best with a relaxed outfit that isn’t overly conservative.
It’s remarkably similar to the simple oriental knot, so it’s also suitable for social events that aren’t very dressy.
Wear it on dates or weekend outings with friends when you aren’t wearing the four-in-hand tie knot around your business casual office.
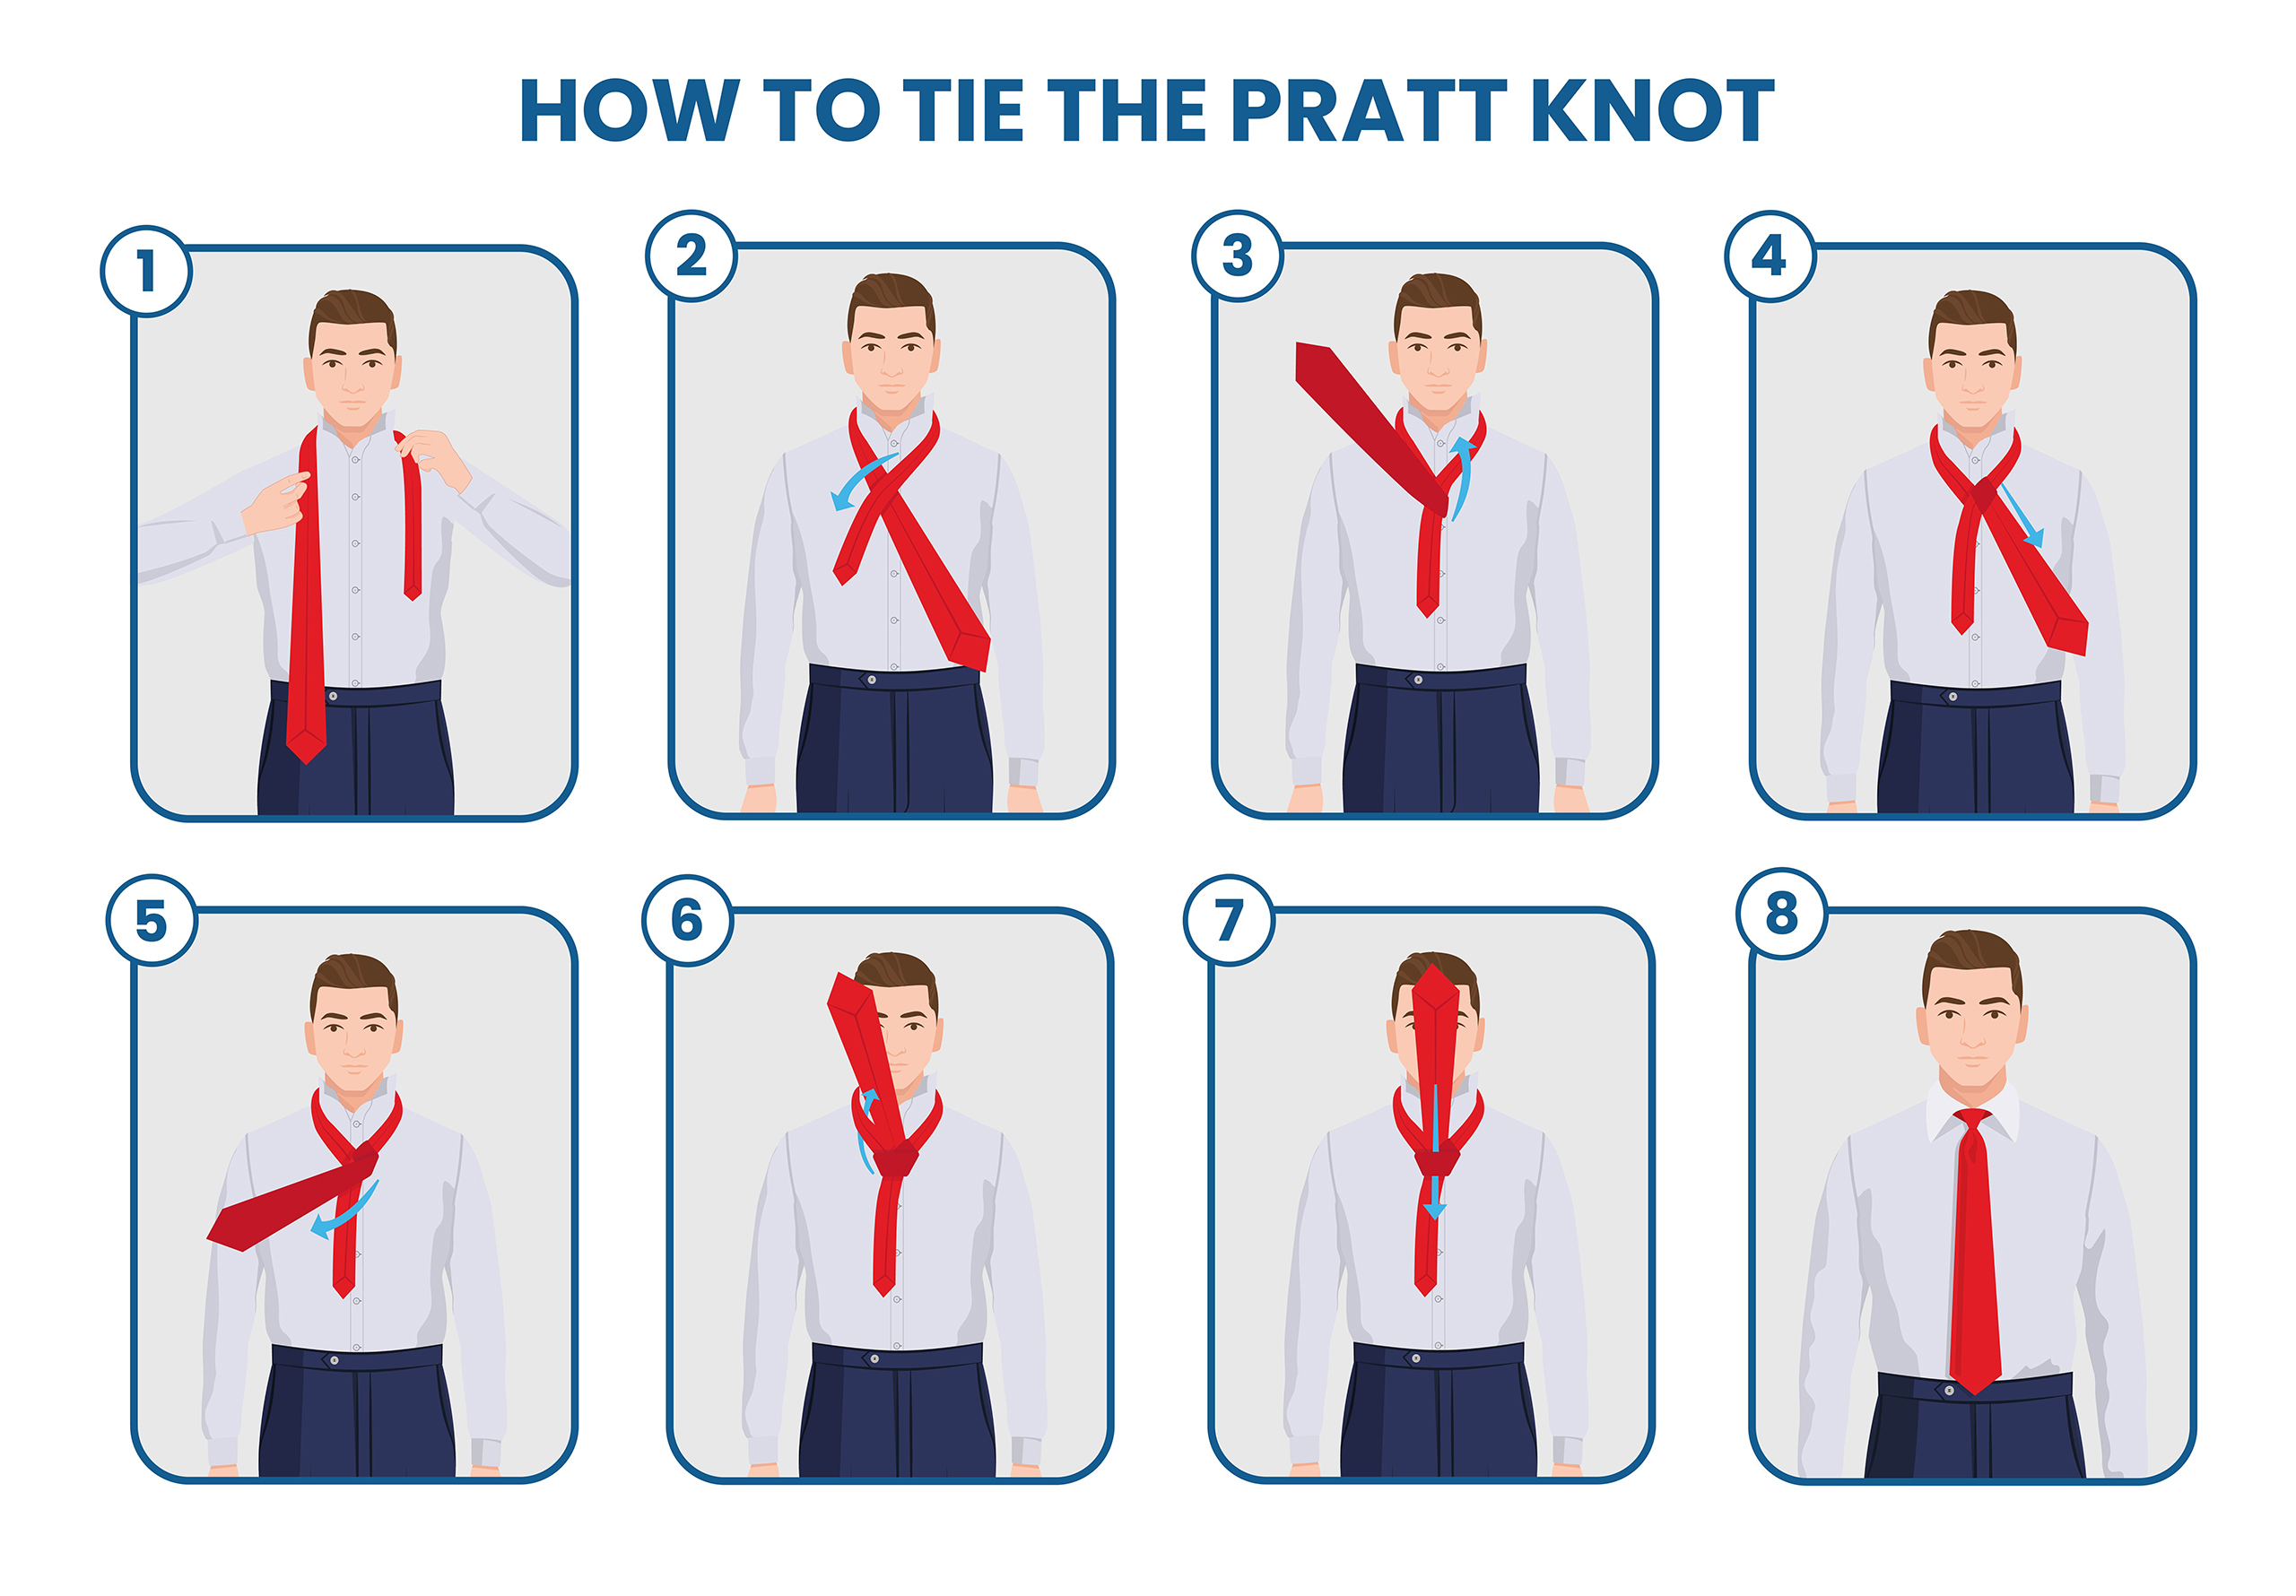
How to Tie a Pratt Knot
- Place the tie upside down around your neck, meaning the seam side should be facing out. Position the wide end on your right and the narrow end on your left around your belly button level.
- Cross the wide end under the narrow end over to the left side.
- Pull the wide end straight up toward your face, folding it over the X you just created.
- Flip the wide end down through the loop and bring it out from the bottom, on your left side.
- Cross this piece over the narrow end back to your right. The “right side” is facing up.
- Slip the wide end up through the neck loop from underneath.
- Tuck it down into the knotted fabric at the center of the neck loop, just behind the top layer of material.
- Pull the wide end all the way through. Then, slide the knot up toward your chin to tighten it.
Pratt Tie Knot Specifications
The Pratt knot is also frequently called the Shelby knot. Either name means the same style of tie knot.
It’s a medium-sized knot, seen as a compromise between the narrow four-in-hand knot and the more substantial Windsor knot.
It is mostly symmetrical but is just slightly askew. This fashion is one of the few unique knots that leaves an inverted tail behind.
The Pratt knot isn’t the most simple knot to learn; it’s a relatively advanced knot to tie.
Therefore, it is best to learn after perfecting the more simple styles, but once you’ve learned the others, you’ll discover that the Pratt knot is barely a challenge.
Good for Semi-Formal & Cocktail Events
The Pratt, or Shelby, knot isn’t a formal-looking style. Instead, it’s ideal for a cocktail party or a wedding reception, as long as it’s not a black-tie wedding.
If you have a work dinner to attend, this would be an excellent time to try out the Pratt knot.
Because it’s a little bit dressy, wear this knot with a more dressy, dark suit. Navy or charcoal are perfect colors for a more formal suit choice.
You can add a white button-up dress shirt with a medium spread collar to round out your ensemble.
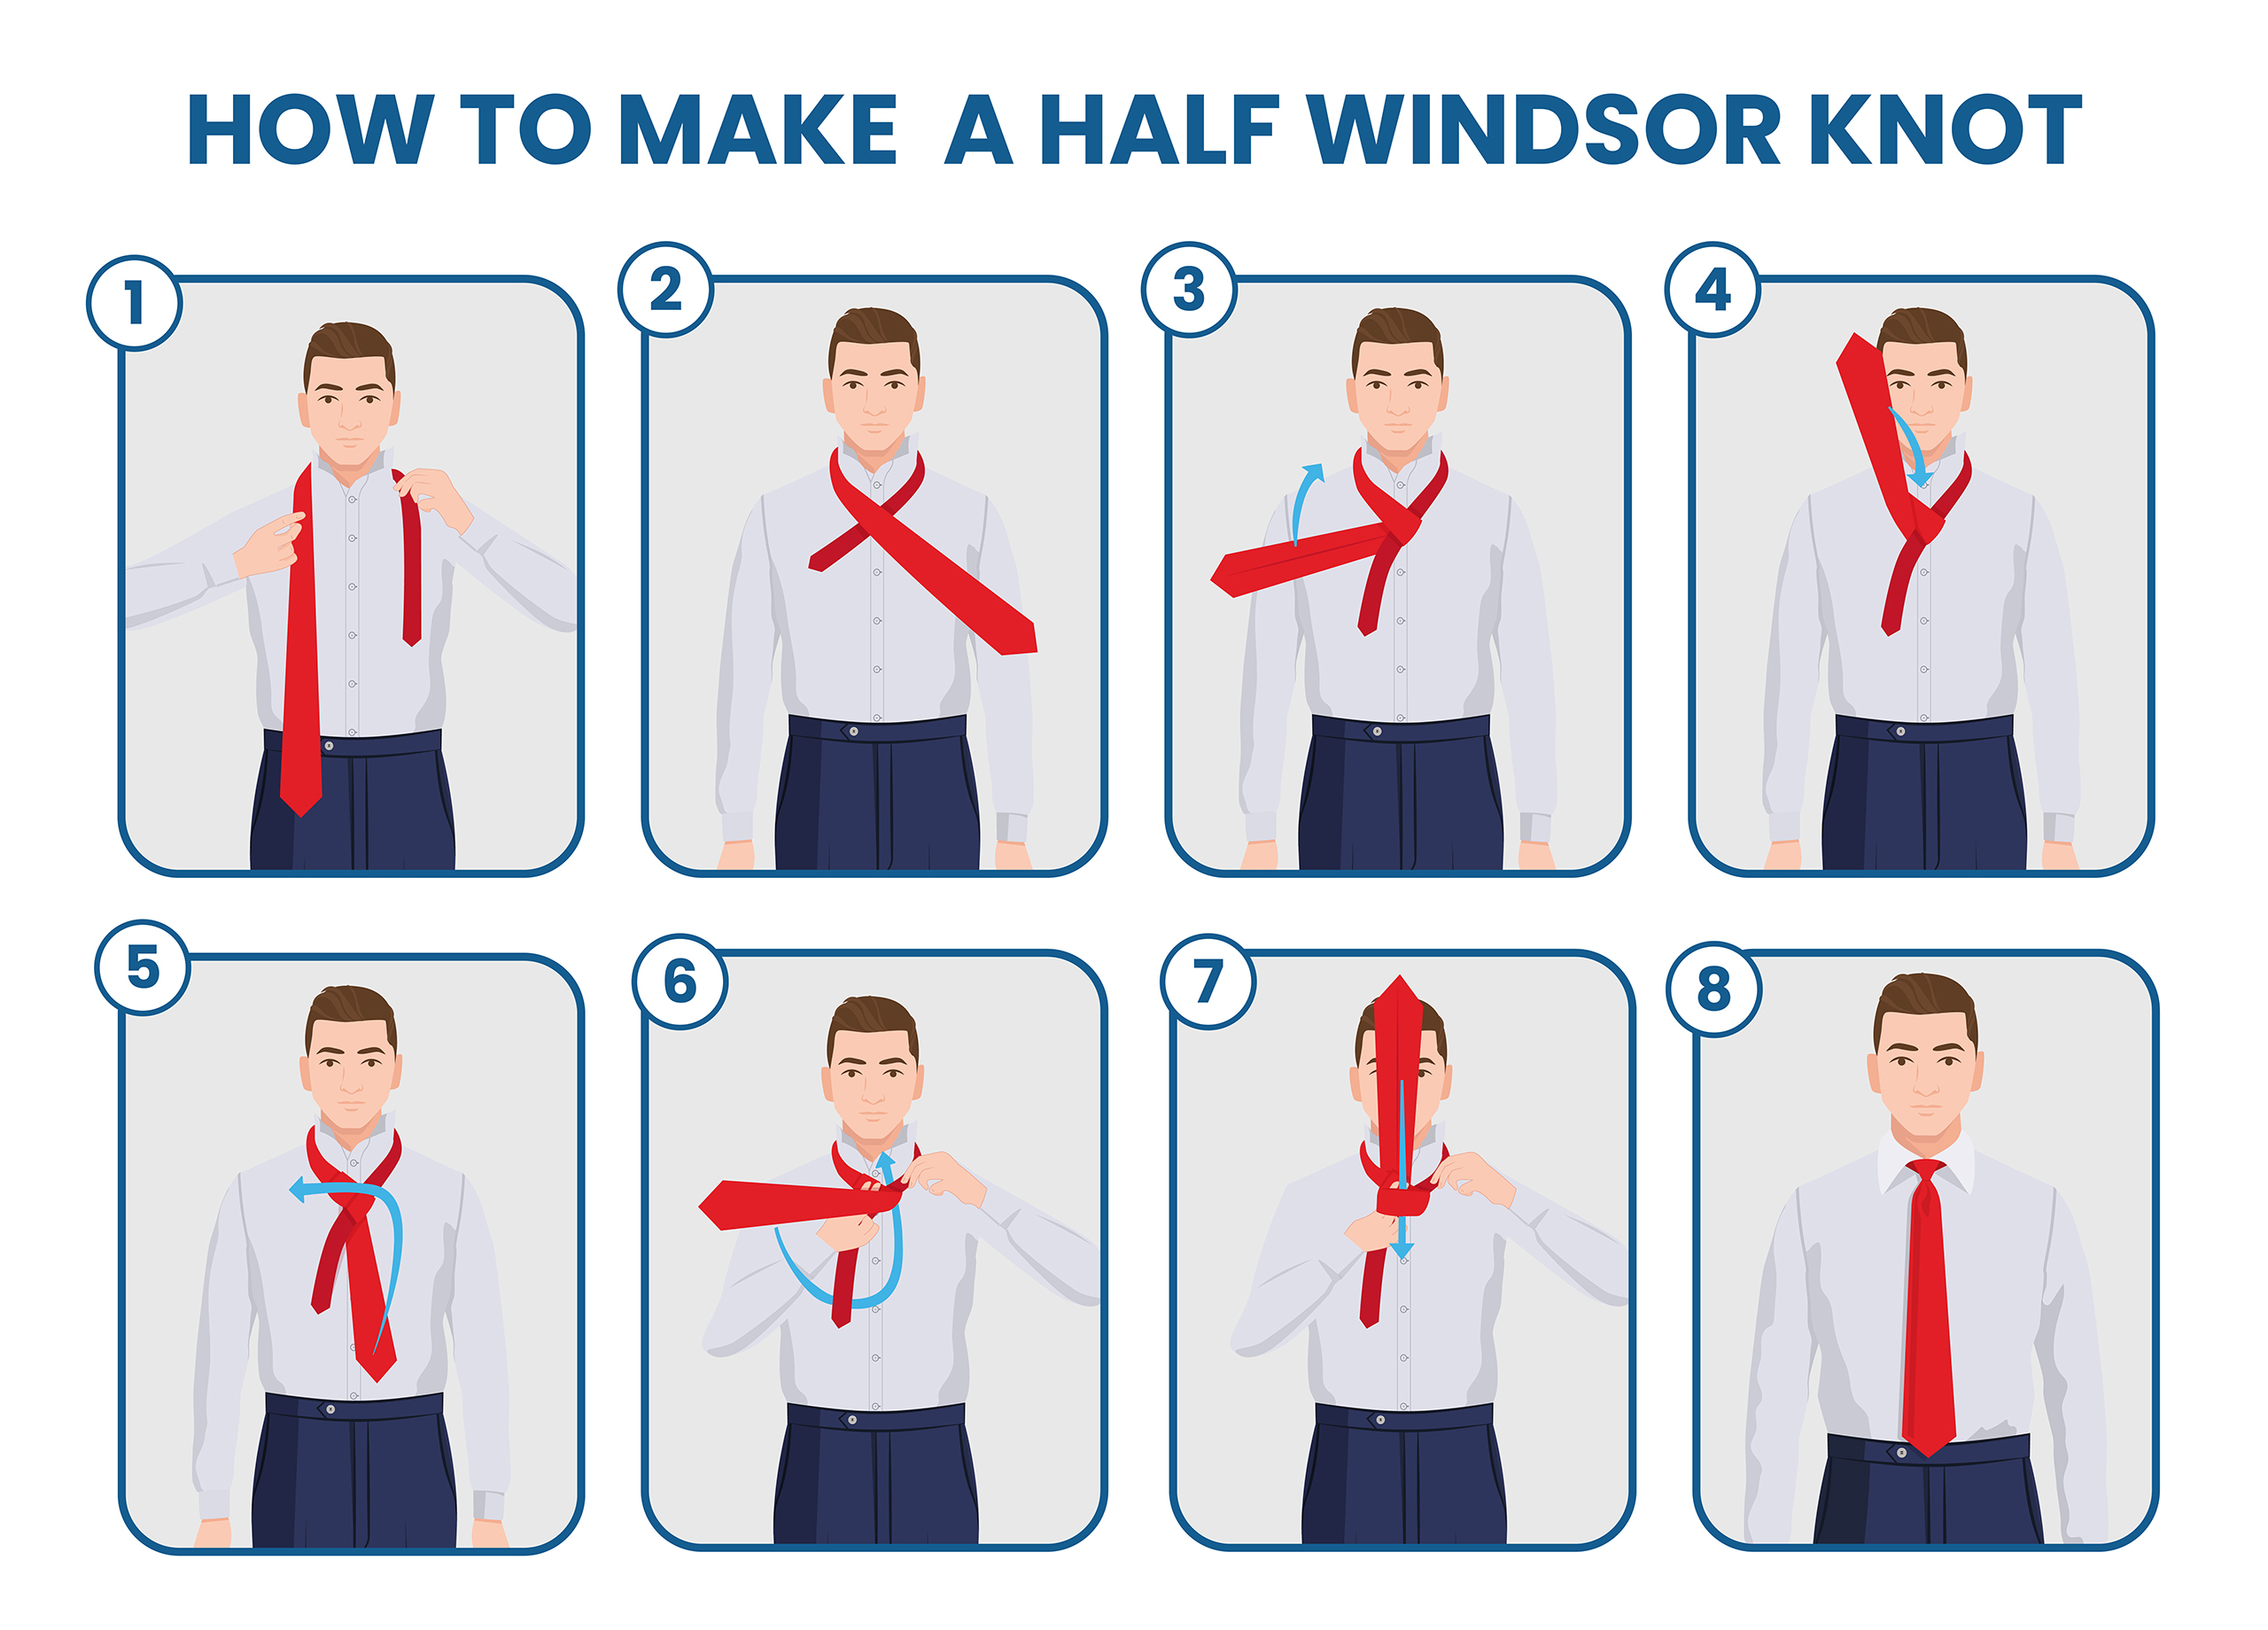
How to Tie a Half-Windsor Knot
- Position your tie around your collar. Drape the wide end on your right with the narrow end on your left. The tip of the narrow end should be around your mid-chest area.
- Bring the wide end across toward your left, over the narrow end. Make this cross just under your chin so the knot is sufficiently tight.
- Wrap the wide end underneath the narrow end. The wide end is now back on your right, only now the “wrong side” is facing up.
- Lift the wide end straight up in front of the neck loop, next to the spot you just wrapped.
- Bring the wide end down through the loop from the top and out again toward your left. The “wrong side” is still facing up.
- Once again, cross the wide end over the narrow end toward your right.
- Slip the tip of the wide end up through the neck loop from underneath.
- Bring the wide end down just behind the top layer of the wrapped tie fabric.
- Pull the tie all the way through. Then, slide the knot toward your top button to tighten it.
Half-Windsor Tie Knot Specifications
The half-Windsor style is a medium-sized knot. However, it isn’t suitable for heavy ties, so stick with medium and thinner ties for this style.
The thicker your tie fabric is, the wider your collar spread will need to be.
A half-Windsor knot isn’t fully symmetrical but is only slightly off. It creates a lovely triangle-shaped knot.
It isn’t difficult to accomplish, but there is a small learning curve as it’s mildly challenging.
Good for Business & Weddings
This is one of the more dressy tie knots you can wear. It’s excellent for business formal, semi-formal events, and most weddings.
So, if you work in a very conservative office or have an important business meeting, this is how you should consider wearing your tie. It’s also perfect if you have a high-profile social function for work.
You’ll likely be in a dark suit when you dress for one of these events.
Of course, you can pair it with a light blue or pale pink dress shirt, but a white dress shirt is always more formal.
Just remember to pay attention to the spread of your collar and ensure it isn’t too wide or narrow for your tie knot.
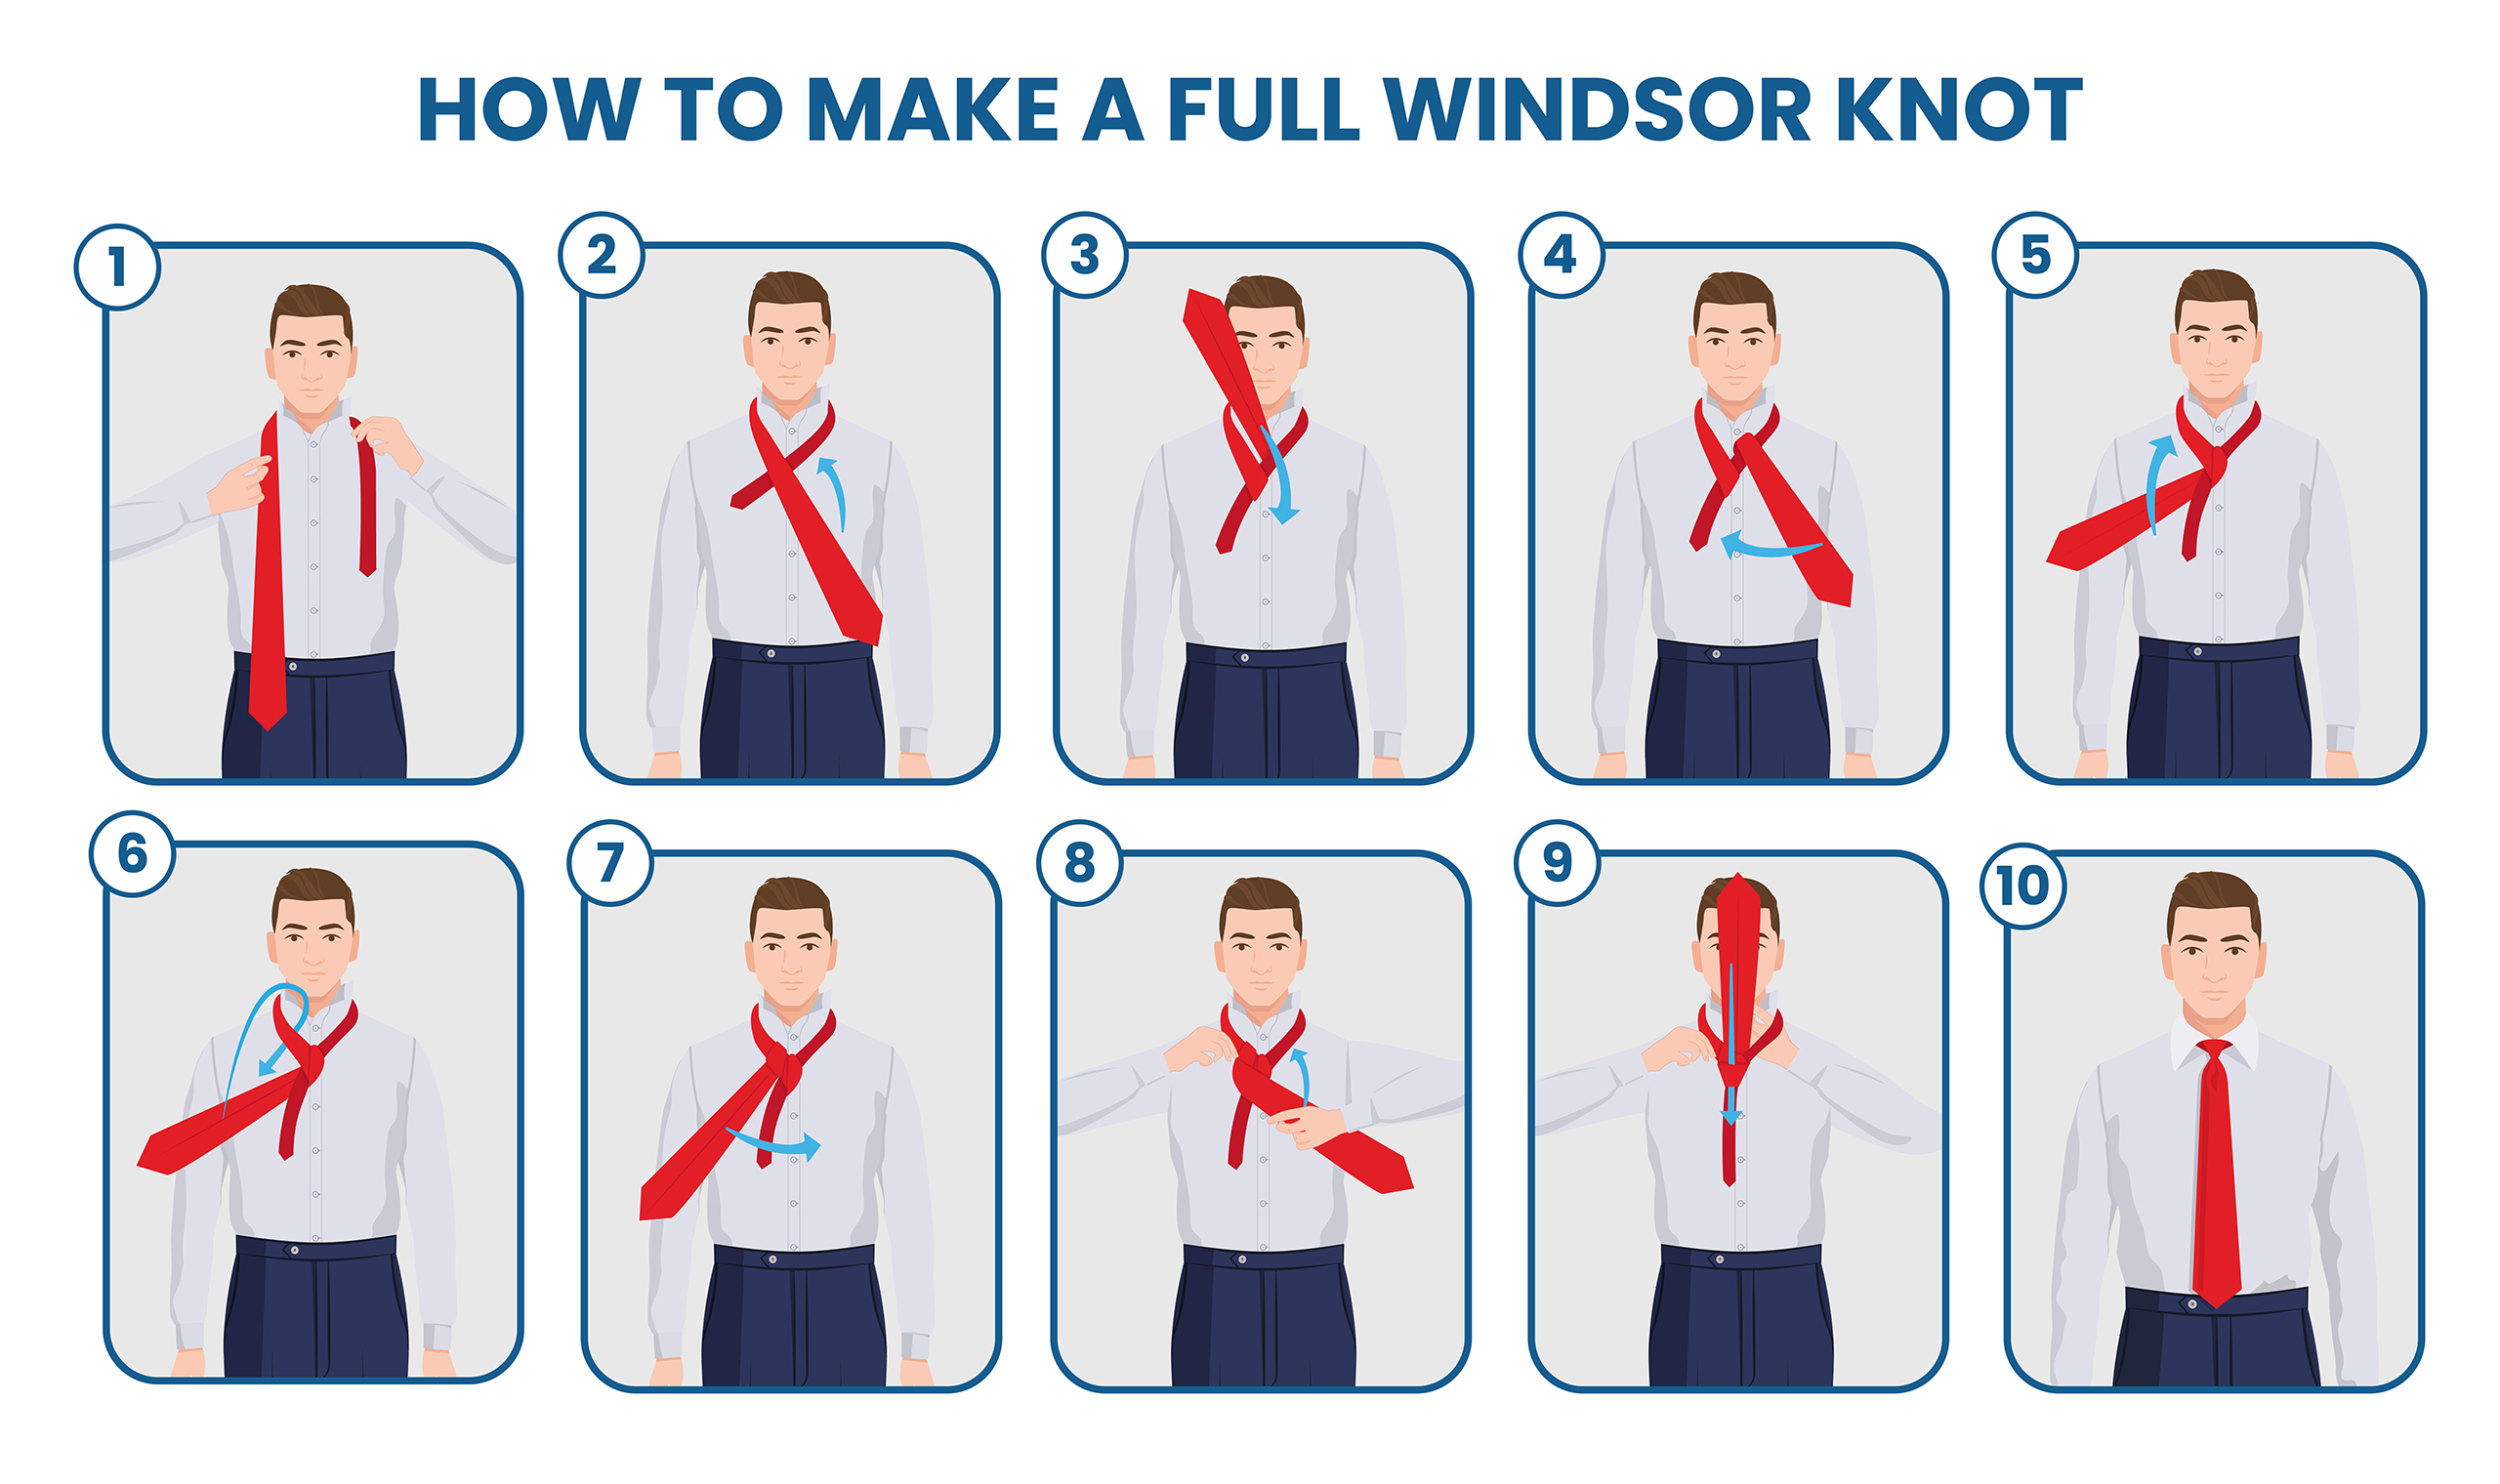
How to Tie a Full-Windsor Knot
- Put the tie over our shoulders, with the wide end on your right. The narrow end hangs from your left and ends just a bit above your belly button.
- Bring the wide end over the narrow end toward your left.
- Flip the wide end up through the neck loop, bringing it from underneath toward your chin. The “right side” should now be facing you.
- Pull the tie all the way out through the top of the neck loop. This end should still be on your right.
- Wrap the wide end behind the narrow end, coming out still on your right. Now the “wrong side” is facing out.
- Pull the wide end straight up but stay in front of the neck loop.
- Next, slip the wide end down through the neck loop from the top and out the bottom. Pull it out on your right.
- Wrap the wide end back to your left, passing it over the knots and the narrow end.
- Once more, bring the wide end under the neck loop and up through.
- Tuck it down just behind the top layer of material over the knots.
- Once you’ve pulled the end through, pull up on the knot to tighten.
Full-Windsor Tie Knot Specifications
You’ll sometimes hear people refer to a double Windsor knot or just a Windsor knot. These are the same as a full Windsor.
This is a pretty large knot. It is a perfectly symmetrical triangle shape, making it a popular, dressy style.
A full Windsor isn’t tricky to tie, but it requires a lot of tie length because it involves many wraps.
You can use this if your tie is extra-long and you need to shorten it or if other knots just leave your tie too long.
Good For Business & Formal Events
A full Windsor is a rather traditional knot. It is perfect for formal events.
It’s also ideal for your most professional settings, such as giving a speech or that super important board meeting.
Wear a full-Windsor tie knot if you’re attending a gala, opera, formal wedding, or other black-tie events.
A medium or wide spread collar is a must with a full-Windsor style because of the knot’s large size.
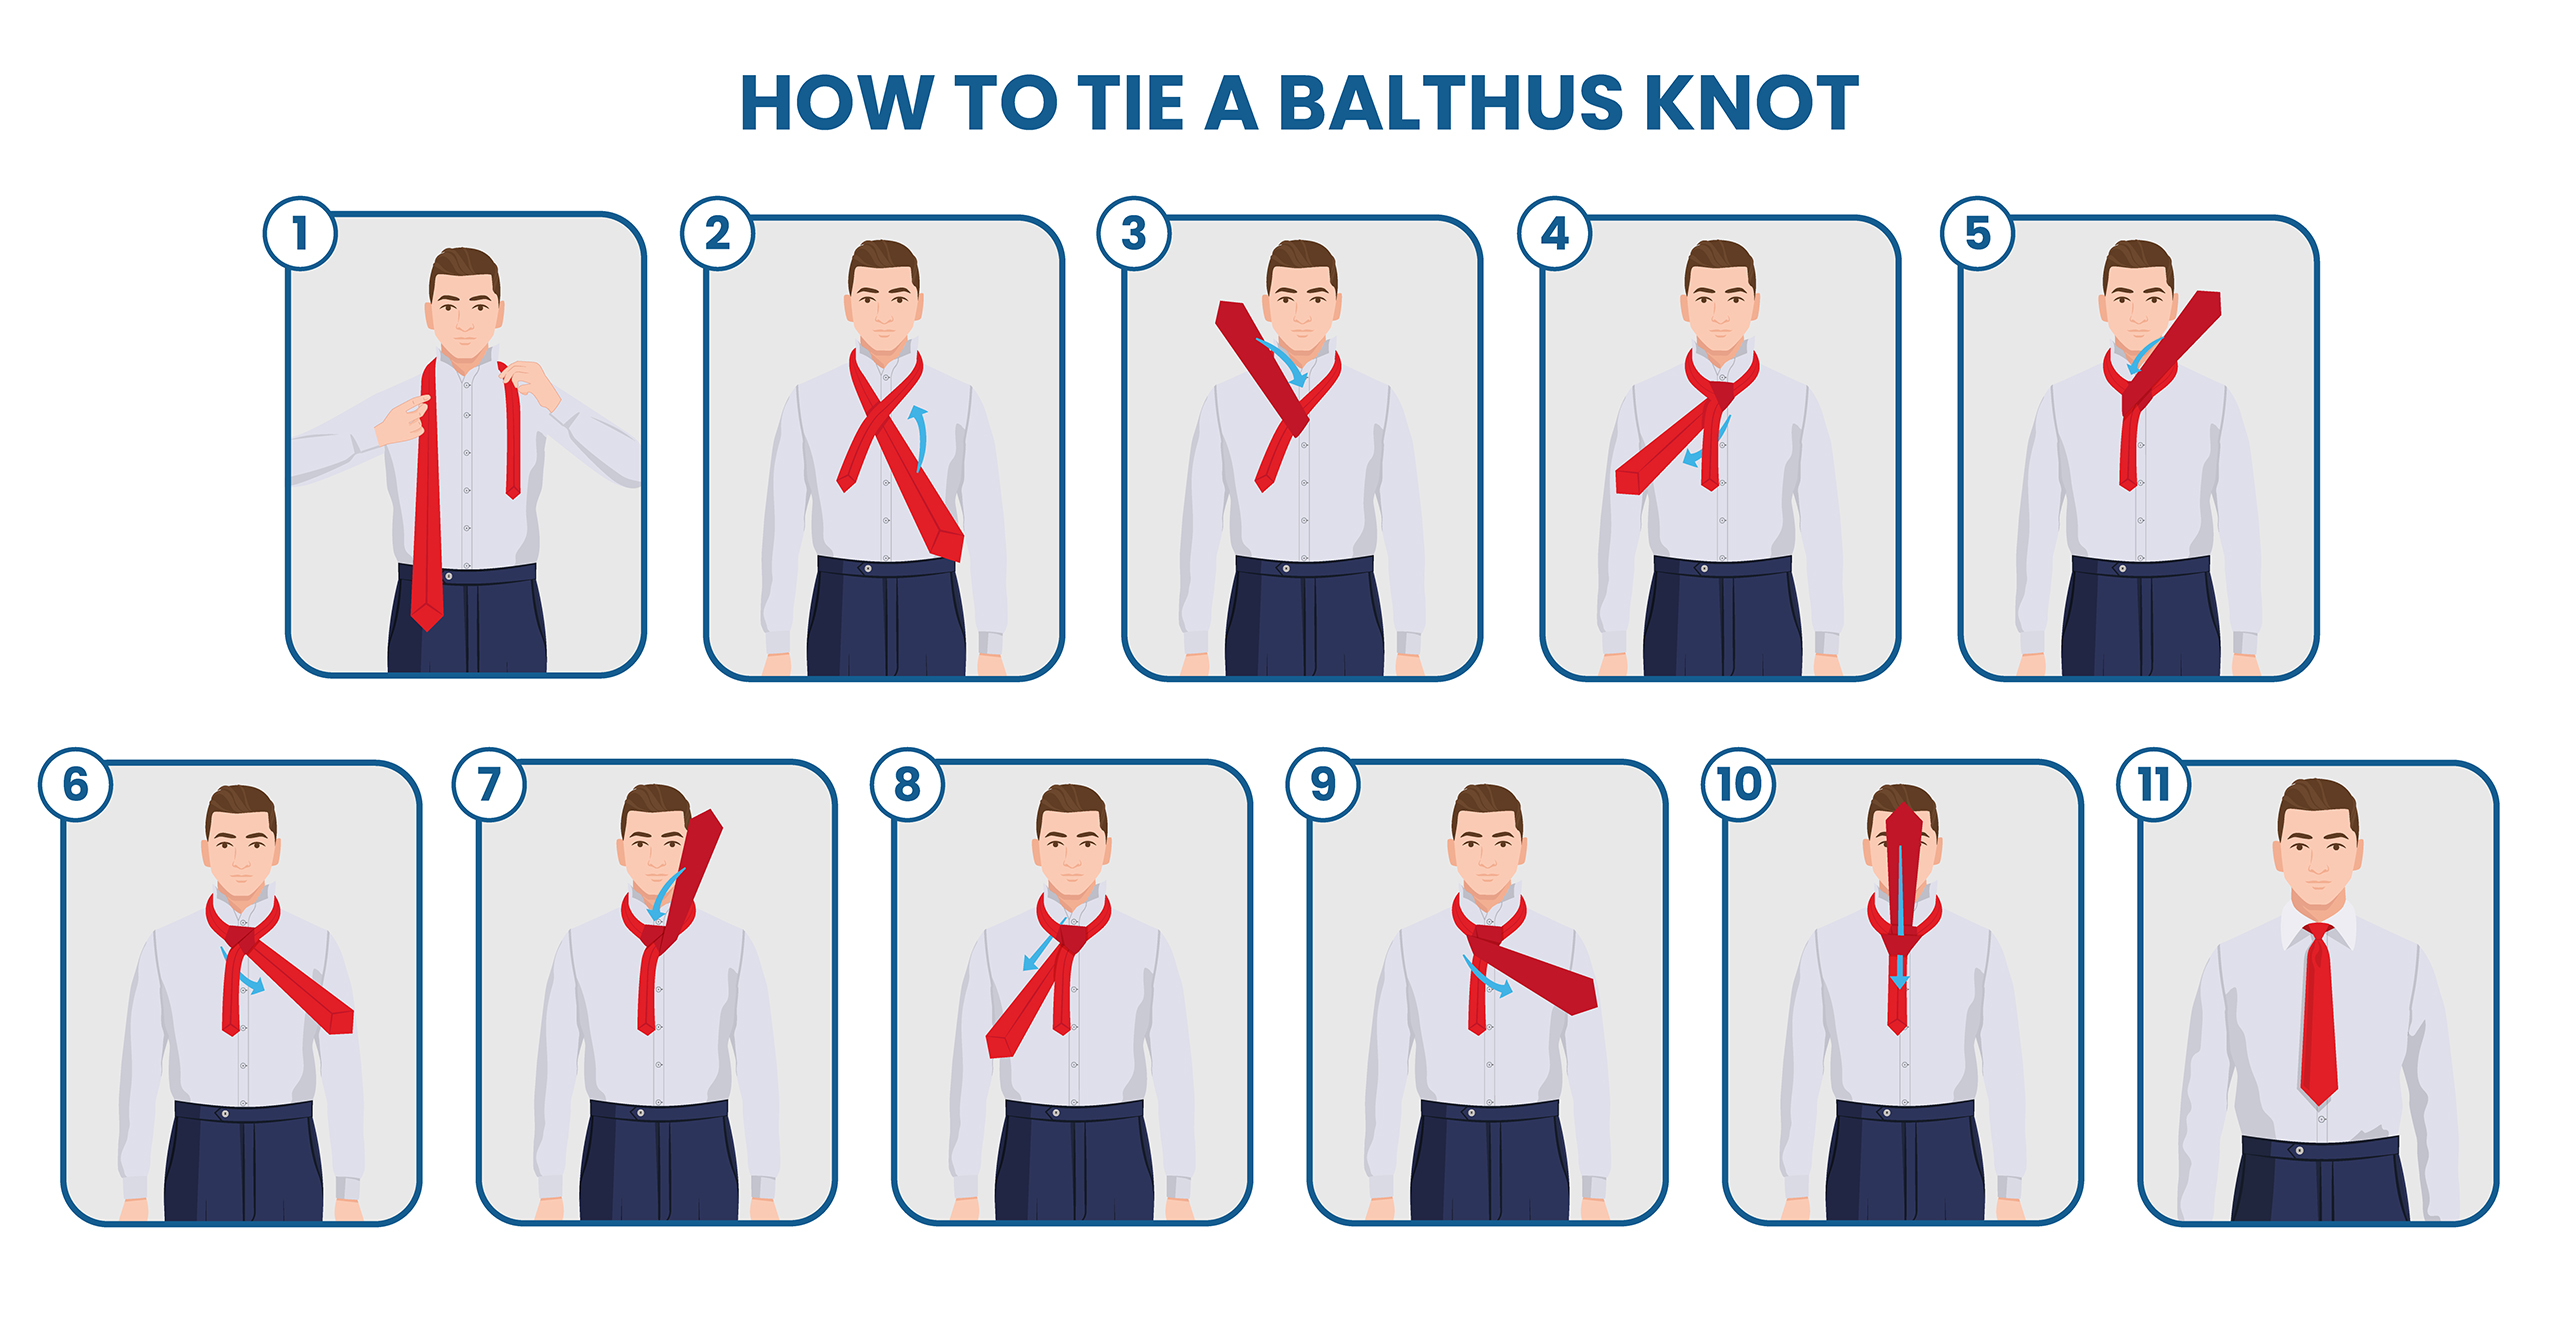
How to Tie a Balthus Knot
- Start with your tie face down (seam side or “wrong side” face out). The wide end should be on your right and hanging very long.
- Move the wide end across to your left, sliding it underneath the narrow end.
- Fold the wide end up toward your face at the center of the neck loop.
- Turn the end of this piece down and insert it through the neck loop, coming out at the bottom on your right.
- Again, fold the wide end toward your face at the center of the neck loop.
- Again, turn the end of this piece down and insert it through the neck loop. But this time, come out at the bottom on your left.
- Fold the wide end up a third time.
- Insert through the neck loop for a third time, coming out on your right.
- Wrap the wide end across the twists and the narrow end, bringing it to your left.
- Slide the side end up through the neck loop from underneath.
- Slip the end into the knot at the center, behind the top layer of material.
- Pull it all the way through. Hold on to the narrow end and push the knot up with your other hand to tighten.
Balthus Tie Knot Specifications
The Balthus knot is one of the largest tie knots you can make; it’s even more prominent than the full-Windsor knot. It forms a perfectly symmetrical, wide cone.
Learning to tie a Balthus knot is a complicated procedure, thanks to how many times you need to wrap your tie.
As a result, it can become easy to lose track of where you are in the process.
And because of all the wrapping, the Balthus knot requires a lot of length. As a result, you are likely to end up with a short tie tail.
Good For Formal Events
The Balthus knot is big and beautiful, making it the ideal knot for formal events.
It’s an exquisite knot, but remember that you will undoubtedly need a wide spread collar because that is the only collar large enough to accommodate this knot!
This knot is an excellent choice to wear if you are attending a formal event where you’ll be surrounded by art and artists; an artist invented the Balthus.
You’ll be making a statement with this oversized knot.
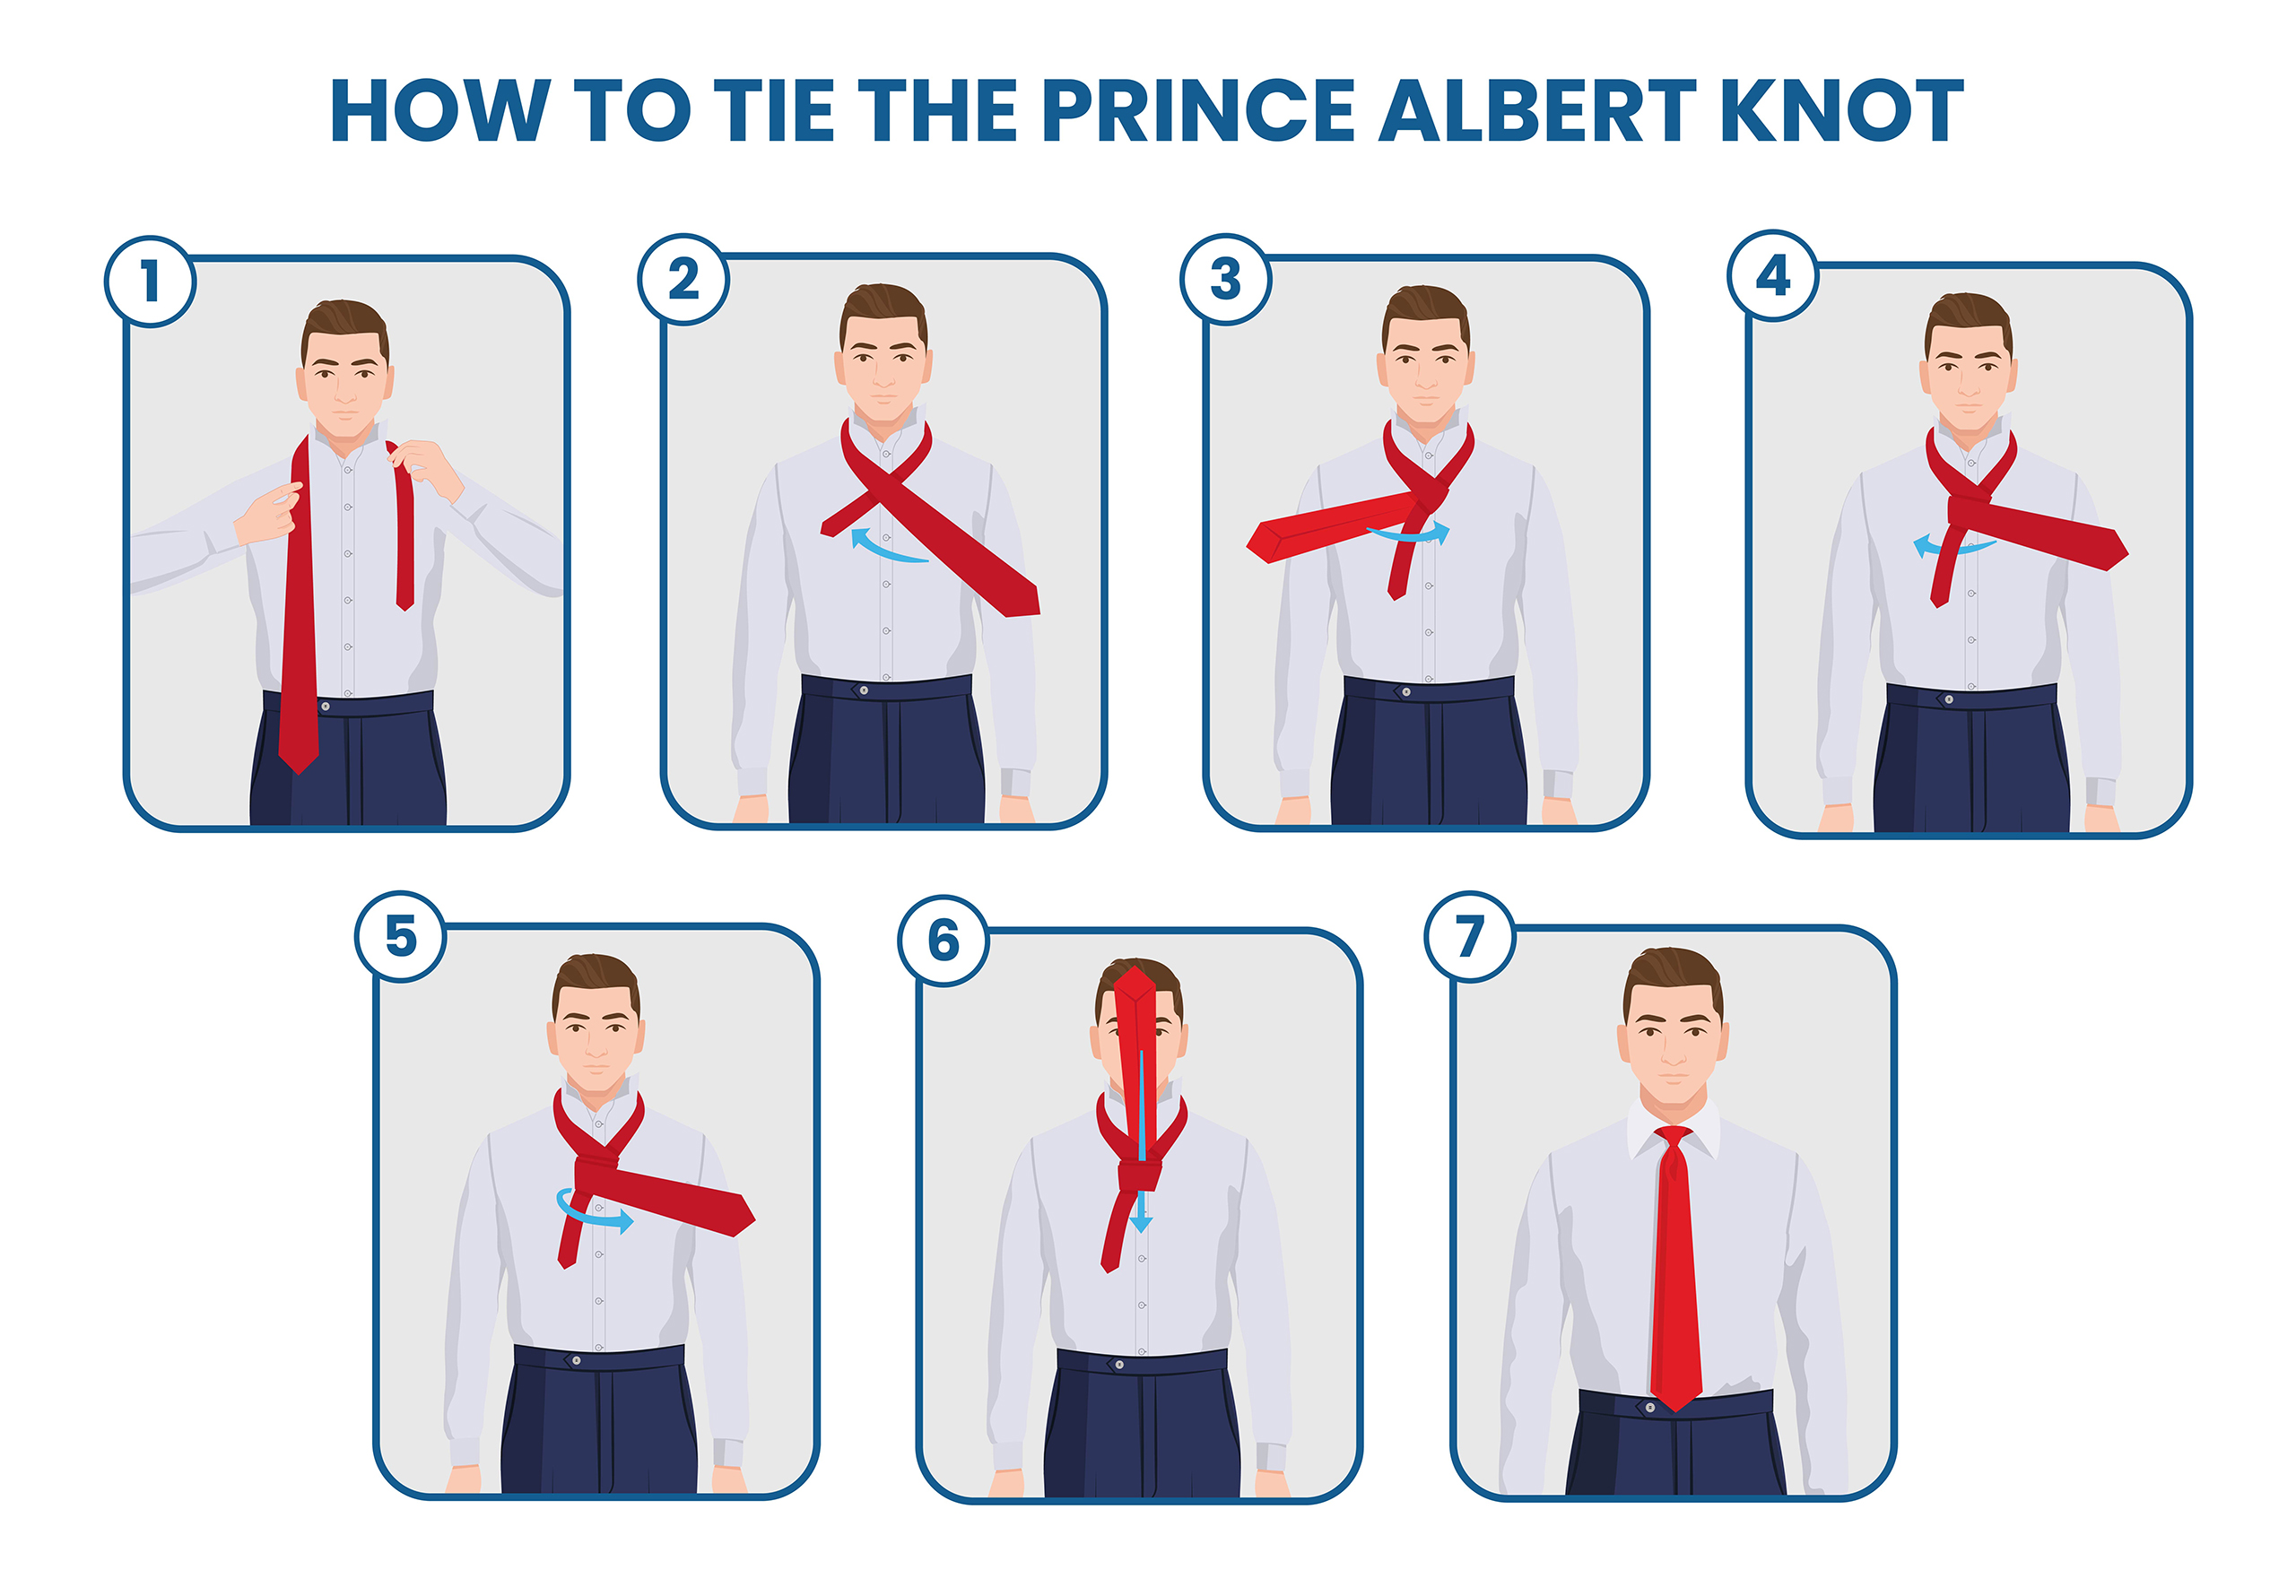
How to Tie a Prince Albert Knot
- Lay the tie around the back of your neck. Position the wide end on your right and the narrow end on your left; the tip of the narrow end should be just above your belly button.
- Cross the wide end across the narrow end to your left.
- Wrap the wide end underneath the narrow end and back to your right.
- Continue to wrap the wide end back over the narrow end and to your left again.
- Keep going, bringing it under the narrow end again and to your right.
- Once more, cross it over the narrow end and to your left.
- Slip the wide end up through the neck loop from the bottom. The “right side” will be facing you.
- Tuck the tie end down through the top two layers you’ve wrapped around the narrow end.
- Pull the wide end completely through the loops and slide the finished knot up to tighten it. You should see one layer of fabric peeking out from under the top layer on your knot.
Prince Albert Tie Knot Specifications
The Prince Albert knot doesn’t stand out because of its size; it’s an average tie knot size, only slightly larger than a Four-in-hand knot.
What makes it unique is the many layers of wrapping needed to pull off this style and the layered look to the knot.
It’s asymmetrical, lending it further quirkiness. Nevertheless, the Prince Albert tie knot is easier to do than you might think.
Don’t be alarmed by the several steps involving wrapping your tie; it’s only mildly more complicated than a Four-in-hand knot. Practicing these steps will make them easier each time.
Good For Business Events
A Prince Albert knot looks flawless and exciting, making it a wonderfully sleek business knot.
If you have a business soiree, this is a fun and professional way to stand out.
The Prince Albert tie knot helps add a dash of personality to your business suit without resorting to a loud, flashy tie print.
Wear this tie knot style with a medium spread collar.
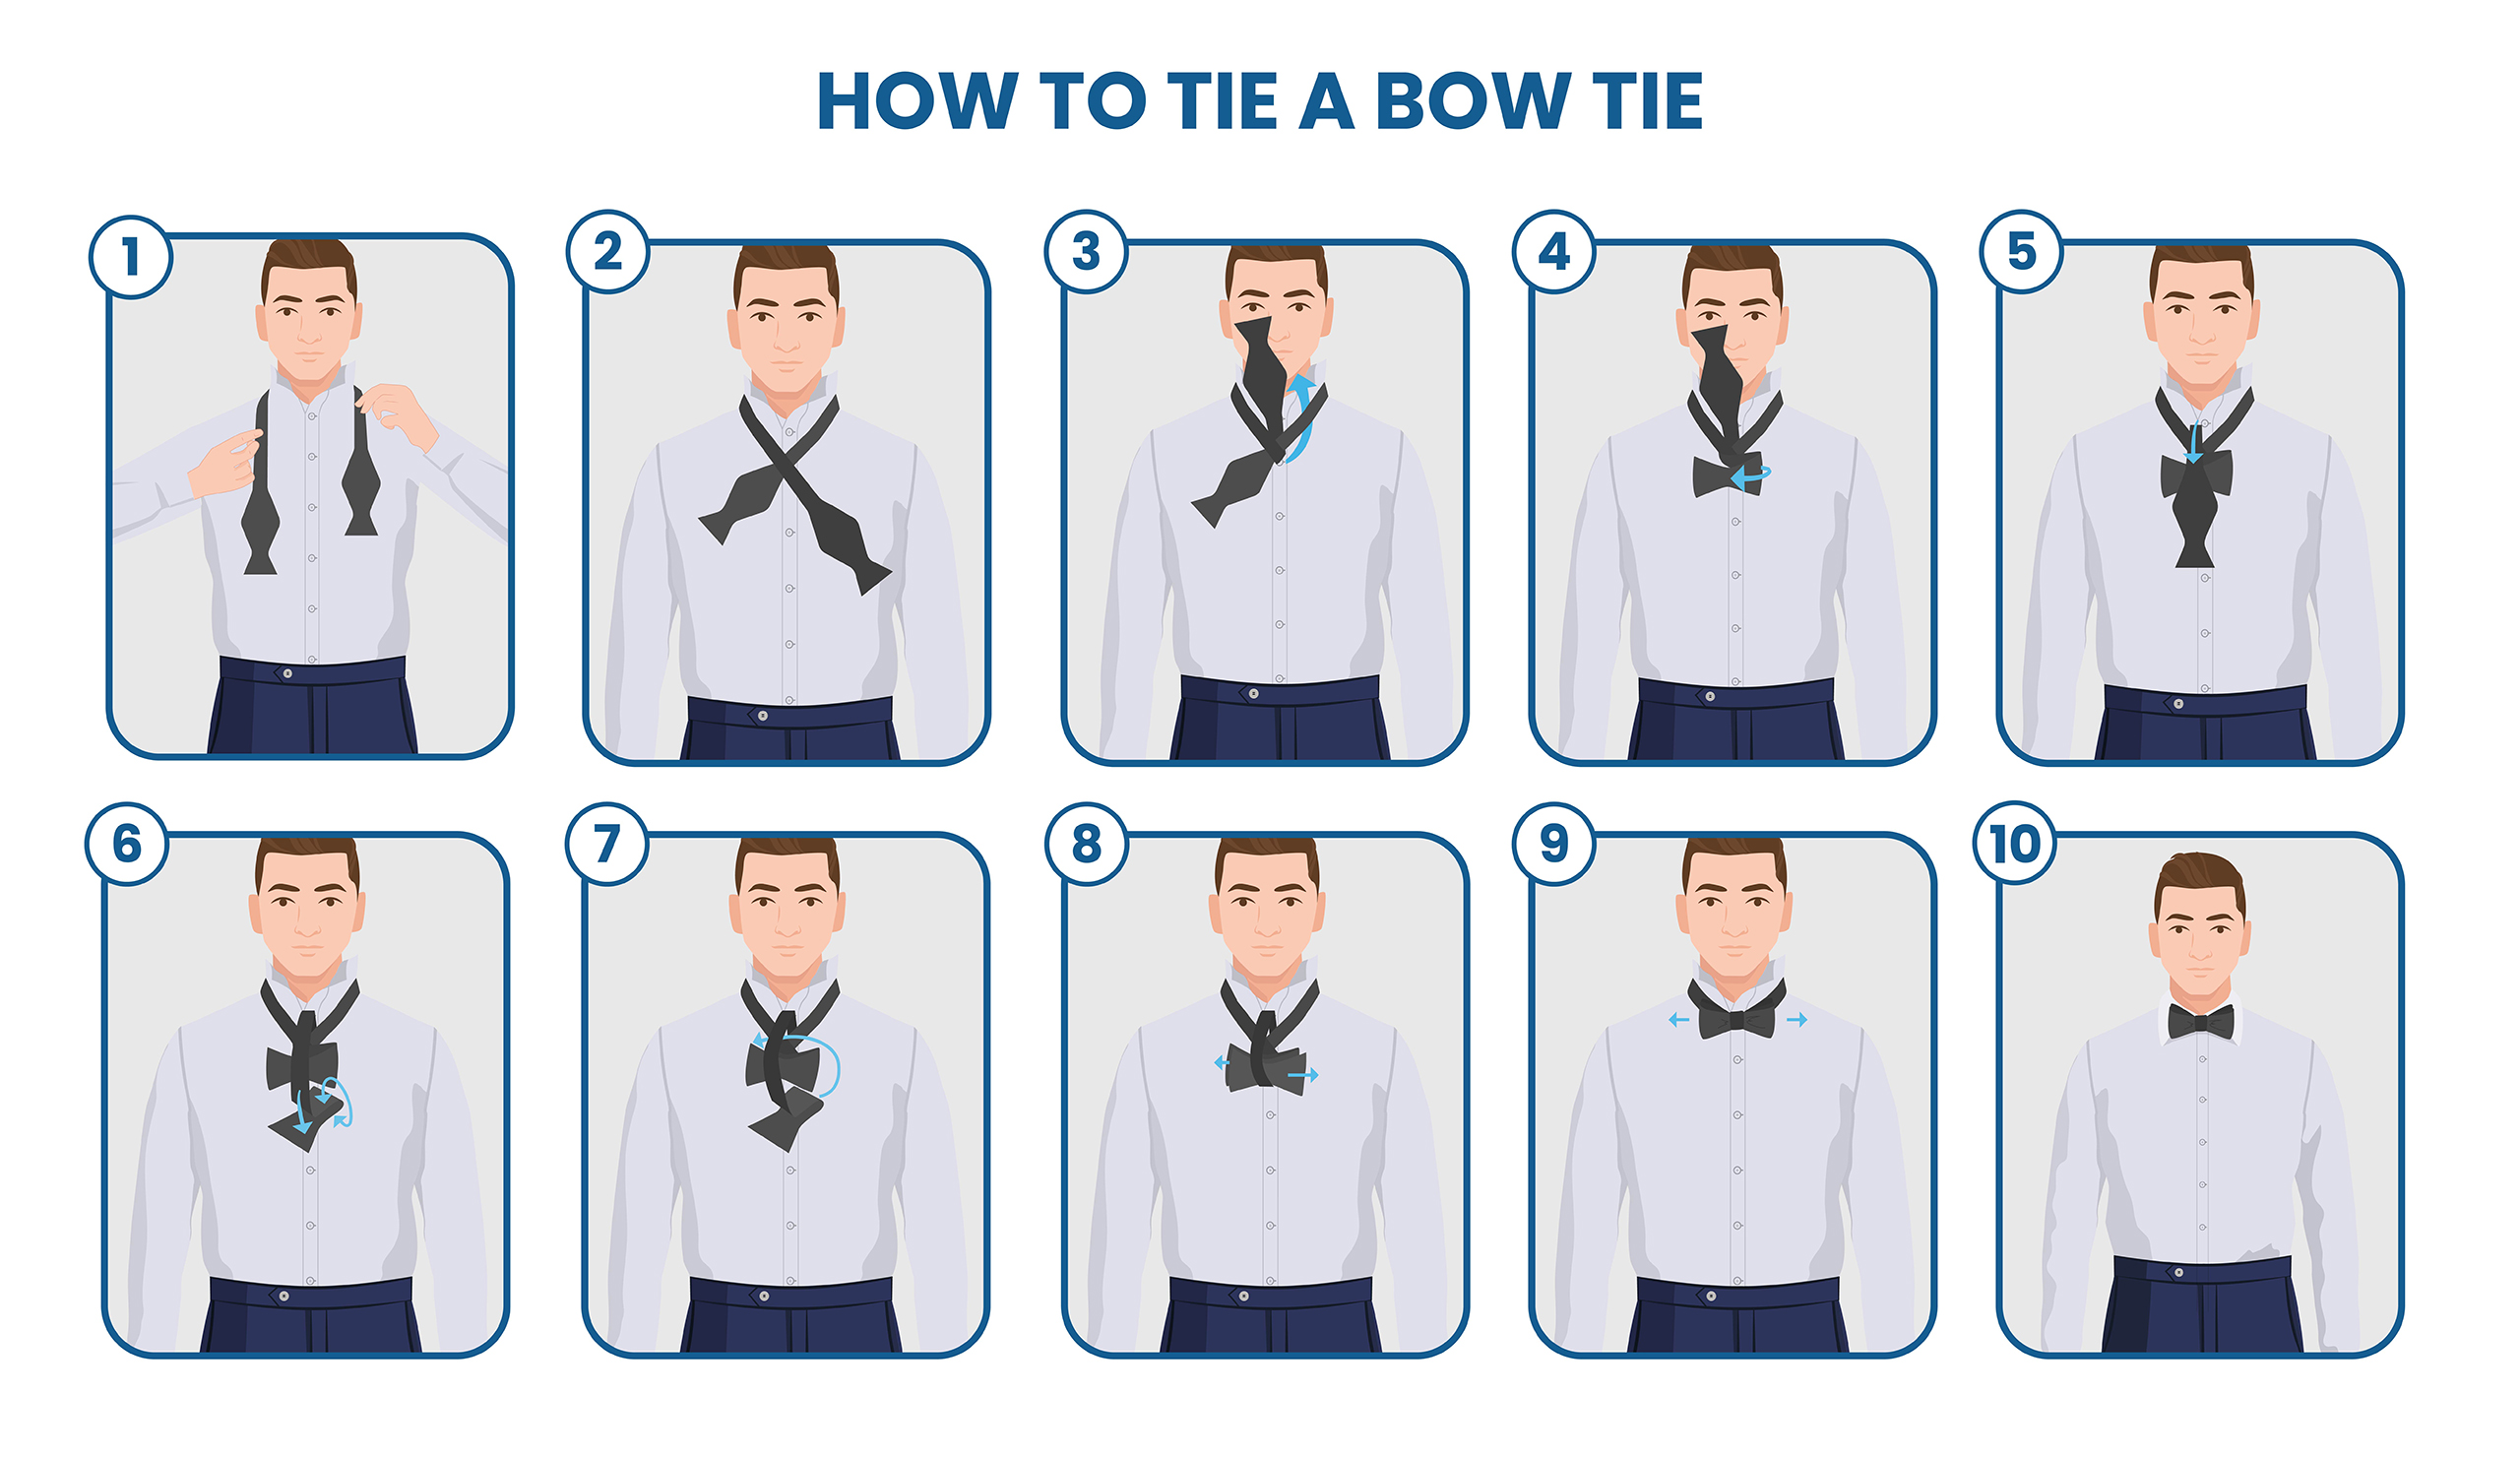
How to Tie a Bow Tie
- Begin with the tie around the back of your neck. The left side (which we’ll call side A) should hang longer than the right side (side B).
- Cross A over B, so it’s on your right.
- Thread A through the neck loop from underneath and up toward your chin.
- Fold B straight back toward your right, remaining horizontal, but then fold it only partway back to the left. Begin this fold at the spot where the shaping begins, so the result is a bow tie shape in the front.
- Wrap A down from the top on the neck loop so it’s perpendicular across the bow shape of B. This will form the knot.
- Fold A over on itself, pinching the fabric at the same spot you folded on B to create the bow shape.
- Holding the pinched spot, push it through the loop you just made behind the bow shape of B.
- Tug gently on the folded spots. They will tighten.
- Straighten your layers until they sit evenly.
How to Wear a Bow Tie
Bow ties are often associated with tuxedos, but they aren’t reserved for only black-tie affairs!
Many professionals love to wear bow ties; they are a perfect way to stand out from the crowd of regular neckties.
Usually, your bow tie will be black silk to match the tuxedo lapels. The best way to wear a bow tie is to pair it with a tuxedo shirt that has a wingtip collar.
But you can also wear a casual suit and pull off a bow tie stylishly. It can be a fun addition to a casual outfit if you opt for a bold and lively print.
And learn how to tie it yourself; never go for a pre-tied bow tie!
Good For Formal & Black-Tie Events
Of course, though, bow ties are most commonly worn with tuxedos.
Therefore, whenever a tuxedo is required, you can expect to find a black bow tie with it.
Red carpet events and formal weddings are the most likely social functions that you’d need to follow a black-tie dress code.
Of course, you can wear one almost any time you want to look professional, quirky, or dressy in an informal way.
Basic Tips When Trying to Tie a Knot
Do you know that old joke about how to get to Carnegie Hall? Well, the punchline can apply to learning a new tie knot: practice, practice, practice.
Even if the tougher knots trip you up a few times, just try it again. You’ll get there.
Once you’ve perfected your tie knots, pay attention to the print of your tie as you pair it with your chosen knot.
Not all knots are flattering on all prints. For example, a simple oriental knot is complimented with a bold pattern, but it will seem rather puny if your tie has a tiny print.
Proper Tie Length
You will hear minor variations on the proper length for your tie, but all experts are within a similar range.
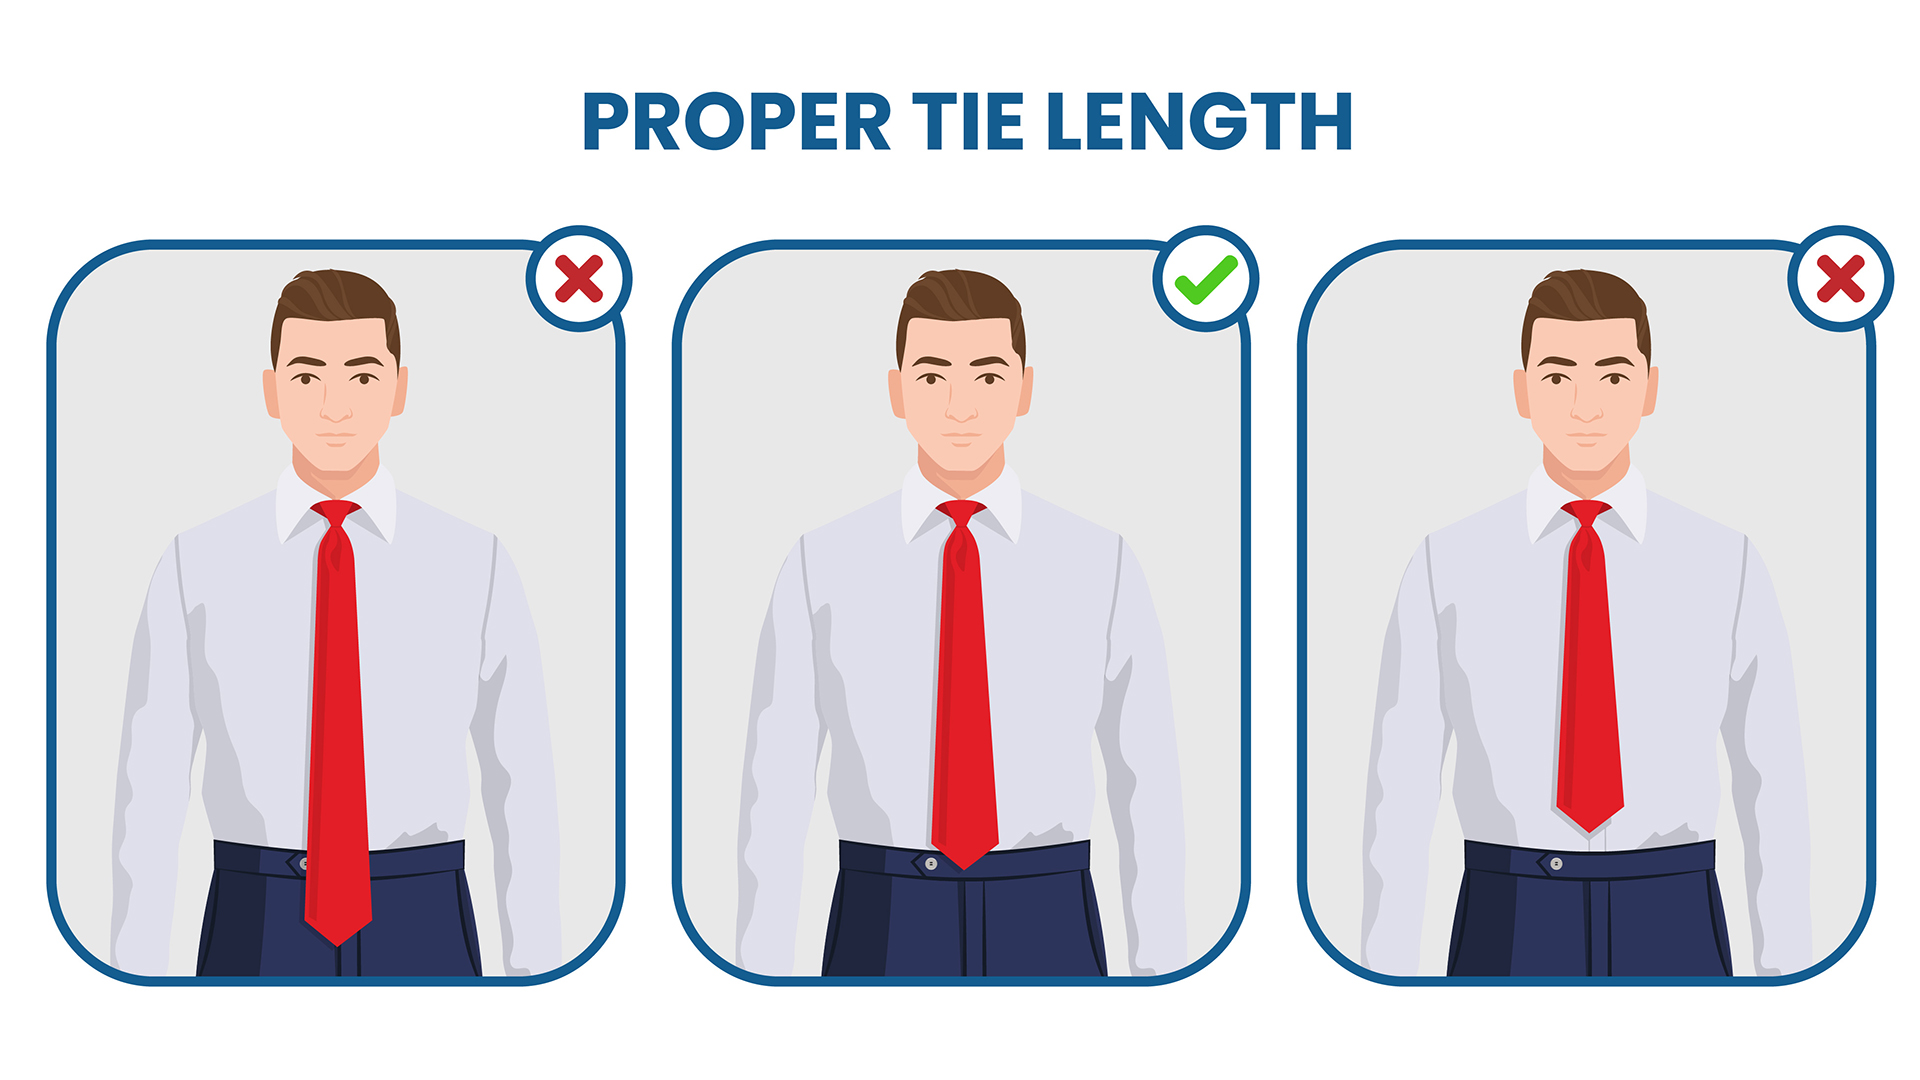
The tip of your tie should reach just to the top of your belt buckle or just past it.
If your tie is too short, you risk looking like a dork. Your tie needs to be long enough that we don’t see any of your shirt between your tie and your belt.
If your tie is too long, you’ll look sloppy. Do not allow your tie to hang lower than your belt buckle.
There’s a very thin margin of error here, so simply take it off and re-do your knot if your tie is slightly off.
You can tie a necktie in a different knot to get a new length or do the same knot but adjust your starting point.
How the Tie Material Affects the Knot Type
You may not think much about your tie material in terms of how it affects your knot, but it is an essential component.
For example, if you have a thick tie fabric, you’ll need a wide spread collar to accommodate the expansiveness of your tie.
And if you are wearing a wide spread collar, you need to wear a large-sized knot in your tie so you can fill that space.
Silk, linen, and cotton ties are usually thin fabrics. These types of ties go well with Four-in-hand or Prince Albert tie knots.
On the other hand, wool is generally a heavy fabric, so you should wear wool ties with Windsor or Balthus knots.
How to Tie a Tie FAQs
Which is the easiest knot to tie?
Four-in-hand and simple oriental tie knots are the easiest ways to knot your tie. Although most Westerners are never introduced to simple oriental tie knots, four-in-hand is so easy that most people learn that method first.
What is the best tie knot I can use for weddings?
Weddings are often when you need to look your best, so go with a formal way to wear your tie. Half-Windsor or full-Windsor are the two most common formal styles for tie knots.
What is a good tie knot my son can use for school?
A classic tie knot that isn’t challenging is best for school boys, so they aren’t struggling in the morning. Teach him both four-in-hand and Windsor tie knots, so he has some variety.
Which tie knot to use for a job interview?
You want to make a good impression on your job interview, but you also don’t want to overdo it and look like you’re trying too hard. A Pratt knot is suitable for both business casual and formal, so you’ll be sure to cover all your bases.
Does the shirt collar size affect the type of knot?
It sure does! If you have a small collar, you want a smaller knot that doesn’t overpower the size of your collar. On the other hand, a large knot is needed to fill that whole space if your dress shirt has a wide spread collar.
Which tie knot is best for a wide spread collar dress shirt?
A wide spread collar leaves a significant gap in between your collar points. Therefore, opt for a large knot like Balthus or full-Windsor that won’t leave any dead space between your tie knot and your collar.

Hi, I’m Alex, and I’ve studied and specialized in styling in Rome. Through my writing, I want to help men dress well and learn the purpose and significance of suits and other formal attire. My final goal is to make men more confident in their wardrobe choice and life in general.